Running Facebook or Instagram ads without proper tracking makes it difficult to understand which campaigns actually drive results. The Meta Pixel, previously known as the Facebook Pixel, is one of the main tools used to track visitor behavior, measure conversions, and improve ad performance inside Meta Ads Manager.
In this article, we will explain what the Meta Pixel is, what you need before installation, and the most common methods for setting up Meta Pixel on WordPress. We will also cover verification steps, common setup issues, and why Conversions API has become increasingly important for modern tracking.
Key Takeaways:
The Meta Pixel can be installed on WordPress using several methods, including the official Meta plugin, manual code insertion, and Google Tag Manager. The official plugin is often the easiest option for beginners and supports modern tracking features, including Conversions API integration in supported setups. After installation, verification through Meta Events Manager or Meta Pixel Helper is important to ensure accurate tracking and conversion data.
What Is Meta Pixel?
The Meta Pixel is a tracking script placed on your website that collects data about user actions after people interact with your Facebook or Instagram ads. It helps advertisers measure campaign performance and optimize ads based on real visitor behavior.
When installed correctly, the Pixel can track events such as:
- Page views
- Content views
- Add-to-cart actions
- Checkout activity
- Purchases
- Lead form submissions
This data helps Meta optimize ad delivery to users who are more likely to convert. It also allows advertisers to create custom audiences and retarget previous website visitors.
Proper setup matters because tracking errors can affect your advertising data, reporting accuracy, and campaign optimization.
What You Need Before Installing Meta Pixel
Before starting your Meta Pixel setup, make sure you have the following:
- A Meta Business account
- Access to Meta Events Manager
- A WordPress website with administrator access
- Defined conversion or marketing goals
- WooCommerce is installed if you run an ecommerce store
Preparing these in advance helps reduce installation issues and setup delays later.
How to Create a Meta Pixel in Events Manager
Before installing the Meta Pixel on your WordPress website, you need to create it in the Meta Events Manager.
Open Meta Events Manager and click Connect Data Sources. Select Web as the data source type, then choose Meta Pixel.
You will be asked to enter:
- A Pixel name
- Your website URL
After completing the setup, click Create.
Meta will then generate a unique Pixel ID linked to your business account. You will use this ID during installation, whether you choose the official plugin, manual installation, or Google Tag Manager.
At this stage, the Pixel exists inside Meta, but it will not collect data until it is properly connected to your WordPress website.
Install Facebook Pixel on WordPress Using the Official Plugin
The official Meta plugin is often the most practical choice for beginners because it simplifies installation and supports Meta’s latest tracking features, including Conversions API integration in supported configurations.
Step 1: Log In to Your WordPress Dashboard
Access your WordPress admin area by visiting:
- yourwebsite.com/wp-admin
- Enter your username and password to log in.
Once inside the dashboard, you can manage plugins, themes, and website settings required for installation.
Step 2: Go to the Plugins Section
From the left-hand menu, click Plugins, then Add New.
This section allows you to install tools that extend your WordPress website’s functionality.
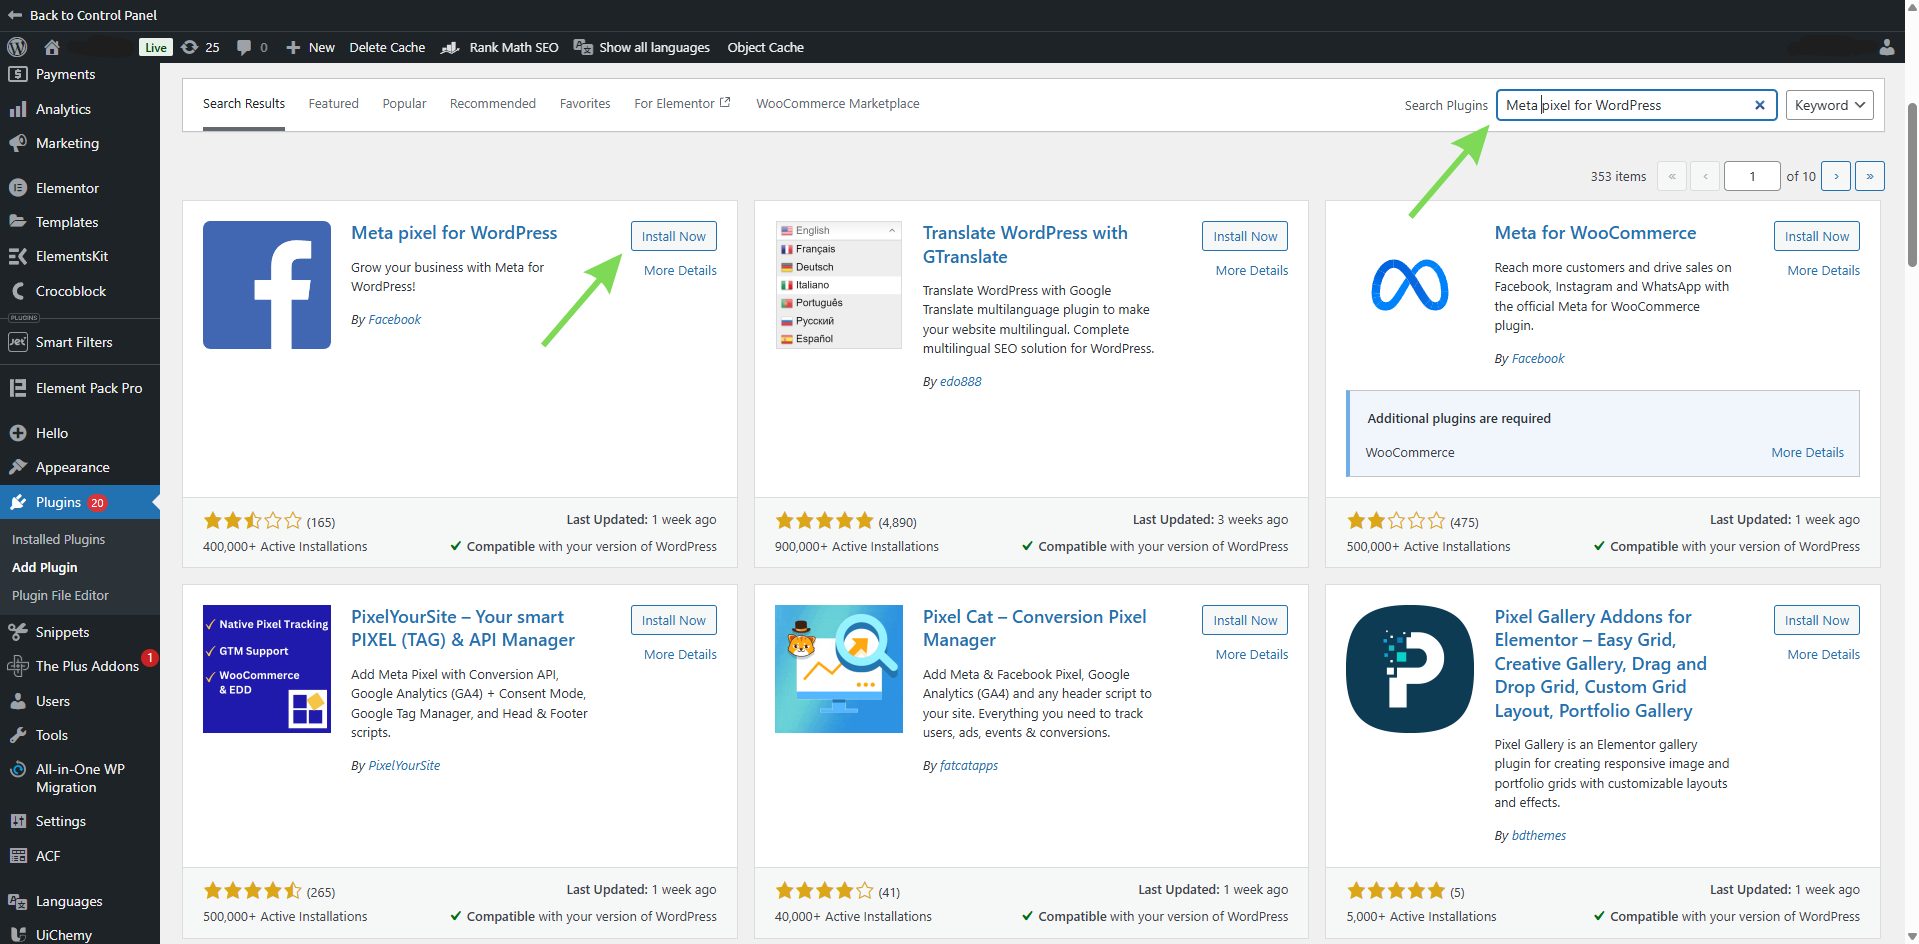
Step 3: Search for the Official Meta Plugin
Use the search field and type:
Meta Pixel for WordPress or Meta Pixel
Look for the official plugin published by Meta.
After finding it, click Install Now, then click Activate.
Step 4: Connect Your Meta Account
After activation, the plugin prompts you to connect your Meta account.
Click Log in with Facebook and sign in using the account connected to your Meta Business Manager.
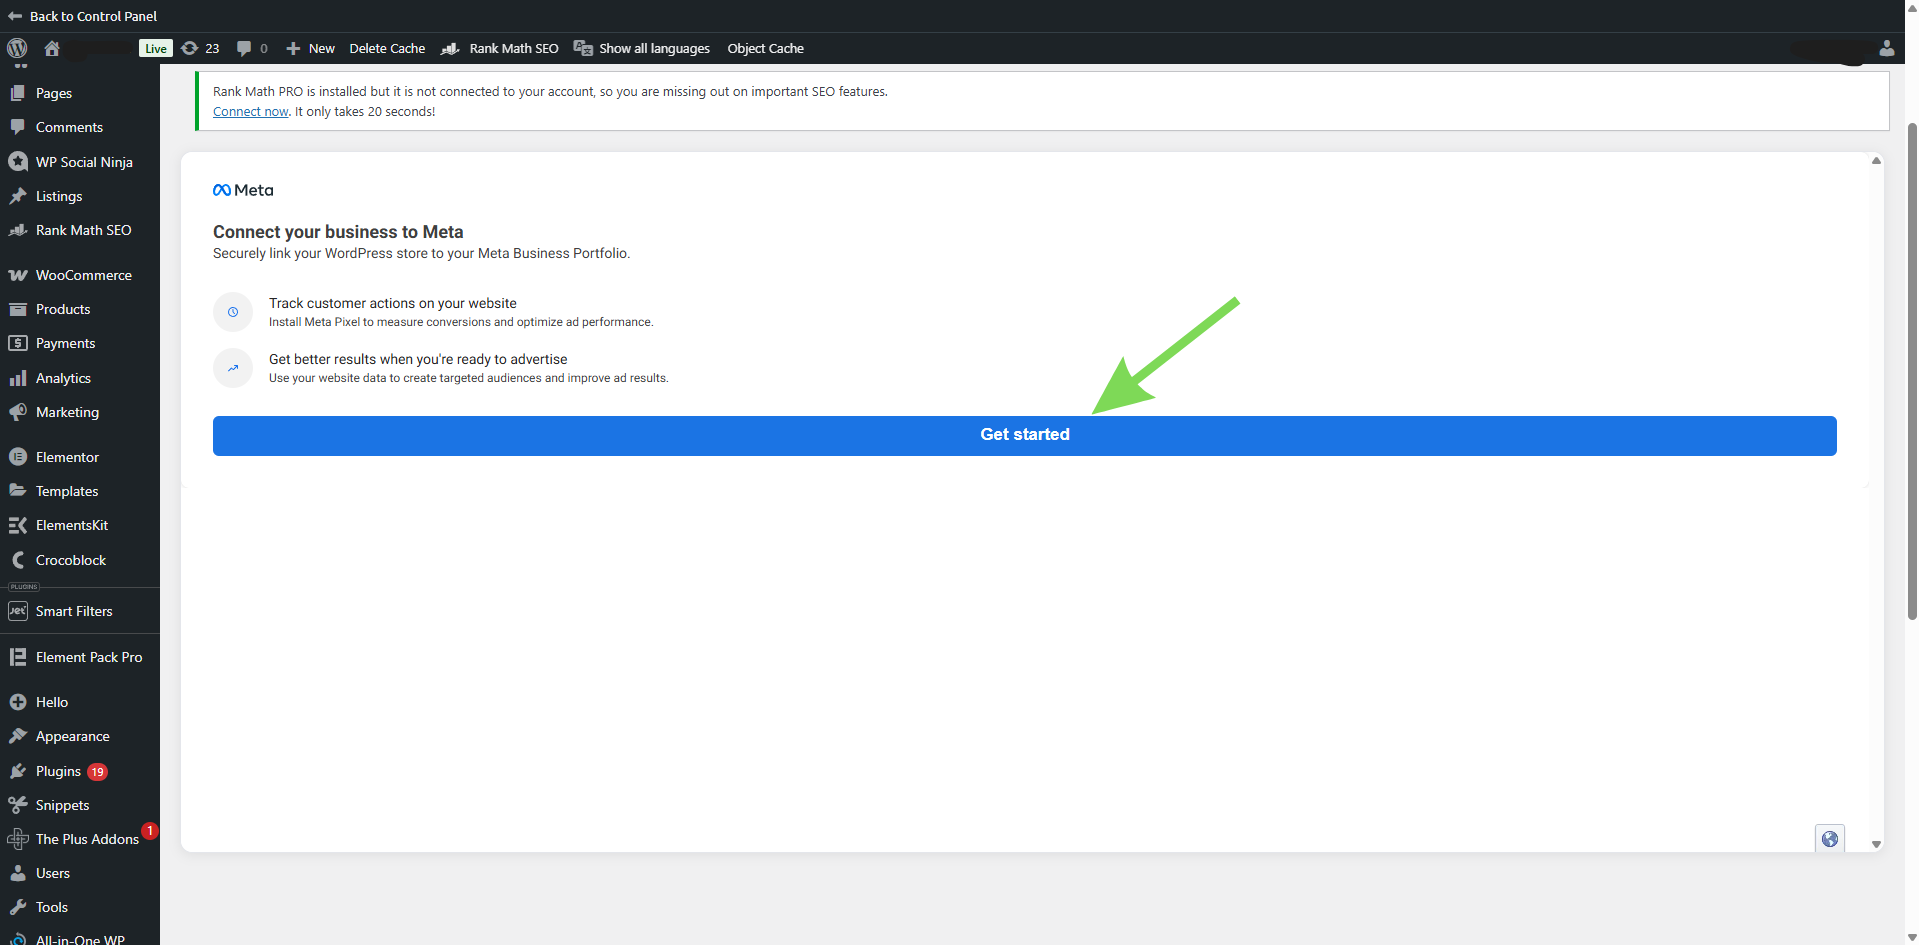
This allows WordPress to access your Meta Business assets, including your Pixel settings.
Step 5: Select Your Meta Pixel
Once connected, choose the correct Pixel from the available list.
If your account contains multiple Pixels, make sure you select the correct one for the website you are configuring.
Step 6: Enable Automatic Event Tracking
The plugin lets you enable automatic event tracking.
This allows Meta to detect actions such as: automatically
- Page views
- Button clicks
- Product views
- Add-to-cart events
- Purchases
This feature helps reduce manual configuration and improve tracking coverage.
Step 7: Verify the Connection Status
After setup, the plugin displays whether your Pixel is connected successfully.
You should also verify tracking using:
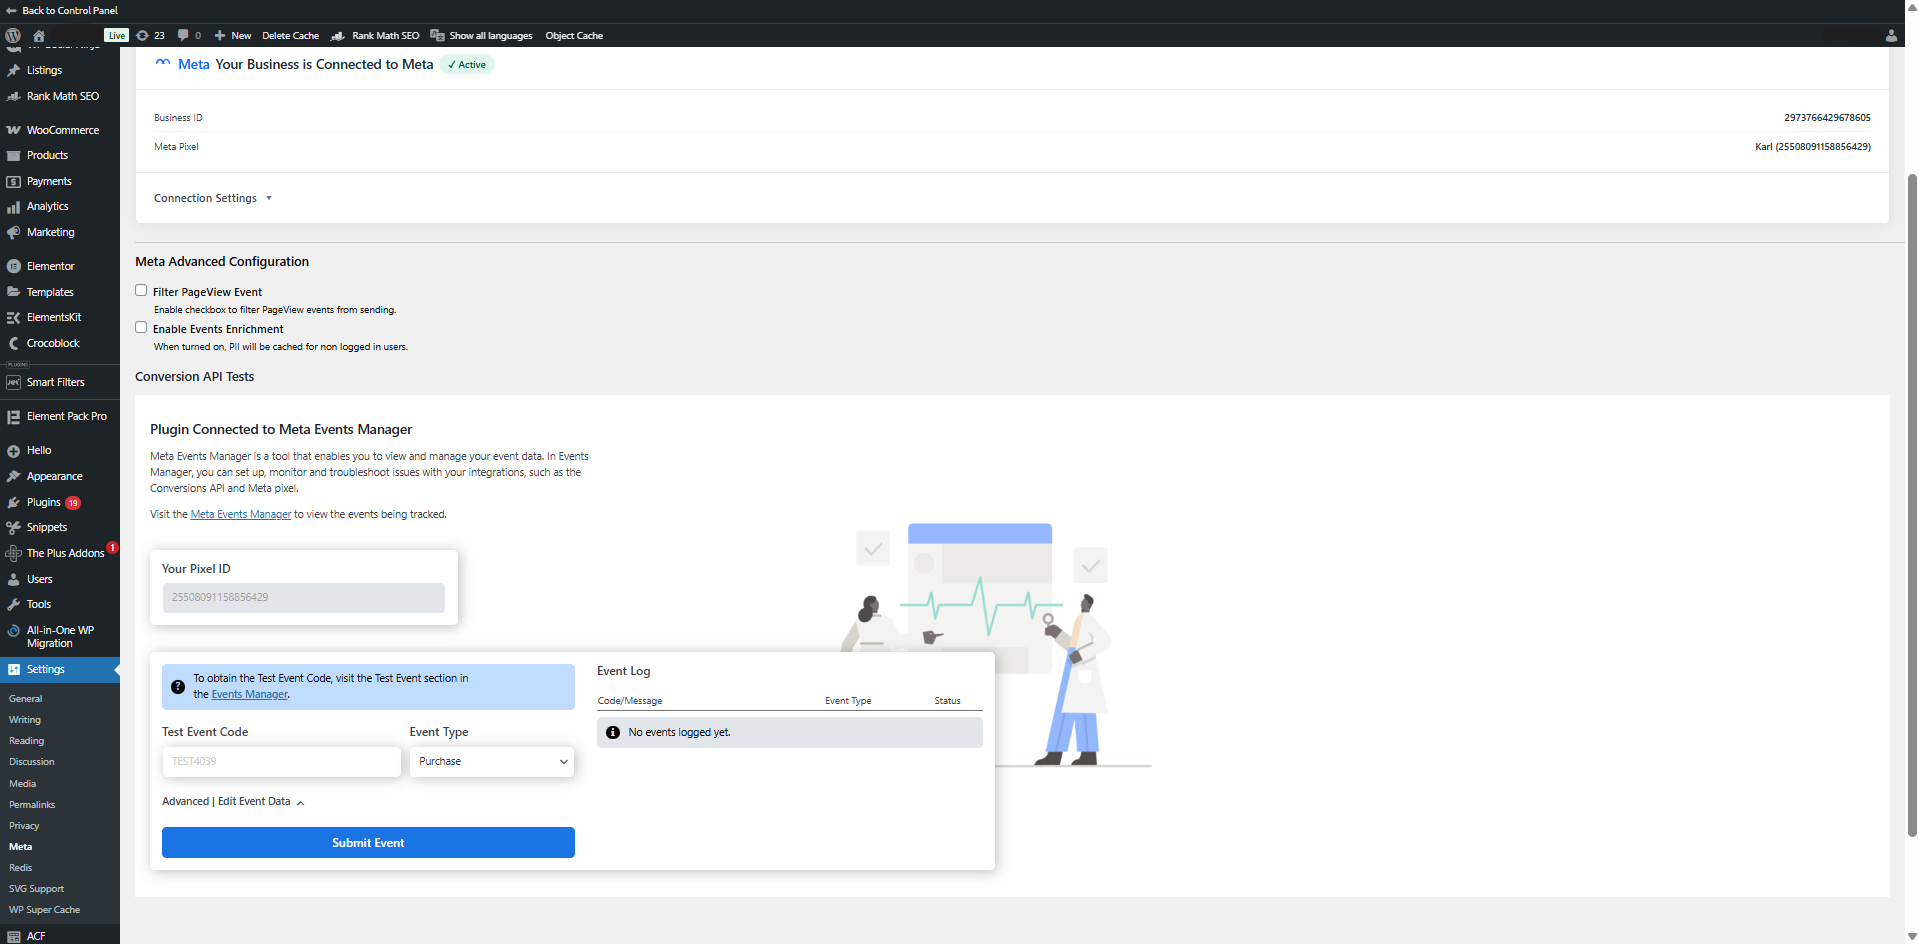
If everything is configured correctly, you should see real-time activity when someone visits your website.
Alternative Methods to Install Meta Pixel on WordPress
Add Meta Pixel to WordPress Manually
The manual installation method involves adding the Meta Pixel base code to your website header using theme settings, hooks, or code insertion tools.
This approach is commonly used for custom-built websites or by users who prefer not to rely on additional plugins.
While it offers more direct control, it also requires careful implementation. Theme updates, code placement errors, or missing event configuration can affect tracking accuracy. Unlike the official plugin, manual installation does not automatically configure standard events.
Install Meta Pixel Using Google Tag Manager
Google Tag Manager (GTM) allows you to install the Meta Pixel without directly modifying your WordPress theme.
Instead, you install a GTM container on your site and configure the Meta Pixel as a separate tag in the GTM dashboard.
This method is commonly preferred by marketers and advanced users who manage multiple tracking tools from a single platform. GTM offers greater flexibility, easier event management, and more control over custom tracking configurations.
Meta Pixel vs Conversions API
The Meta Pixel and Conversions API work together but serve slightly different purposes.
The Meta Pixel tracks activity directly inside the visitor’s browser. Conversions API sends tracking data from the server side instead. This helps improve data reliability when ad blockers, cookie restrictions, or privacy features limit browser tracking.
Many businesses now use both technologies together to improve tracking accuracy and campaign reporting.
Common Facebook Pixel Installation Problems
- Pixel not firing: Often caused by incorrect installation, caching issues, script delays, or missing code placement.
- Duplicate events: usually occur when the Pixel is installed multiple times via different methods.
- Missing conversion tracking: Commonly caused by incomplete event configuration or incorrect WooCommerce setup.
- Theme or plugin conflicts: Performance plugins, script-optimization tools, or consent-management platforms may interfere with Pixel loading.
- Incorrect ecommerce tracking: Product views, checkout events, or purchase events may fail if WooCommerce integration is incomplete.
- Tracking blocked by privacy tools: Ad blockers, browser privacy settings, and cookie restrictions may reduce tracking accuracy for some visitors.
Privacy and Cookie Consent Considerations
The Meta Pixel collects visitor data, which may be subject to privacy regulations such as the GDPR and ePrivacy rules.
Depending on your location and target audience, you may need to obtain user consent before loading tracking scripts. Many websites use cookie consent banners or consent management platforms to control when the Pixel becomes active.
If you are unsure about compliance requirements, consult a legal or privacy professional familiar with your region’s regulations.
Conclusion
Installing the Meta Pixel on WordPress helps businesses track user behavior, measure conversions, and improve the performance of Facebook and Instagram advertising.
The official Meta plugin is often the easiest option for beginners because it simplifies installation and supports modern tracking features. Manual installation and Google Tag Manager provide additional flexibility for advanced tracking setups.
After installation, always verify your Pixel using Meta Events Manager or Meta Pixel Helper to confirm that events are firing correctly and that data is being collected accurately.
At Jump.bg, our WordPress support service helps website owners maintain secure, stable, and high-performing WordPress websites. We assist with plugin updates, performance optimization, security monitoring, WooCommerce support, and troubleshooting issues affecting tools like the Meta Pixel.
If you need professional assistance with your WordPress setup or ongoing maintenance, you can contact us at 02 428 8888 or email sales@jump.bg.