
Tracking visitor behavior on your WordPress site starts with having the right setup in place. Google Tag Manager gives you control over how tracking works on your site, but only if it's installed correctly. A missed step or misconfiguration early on can compromise your data down the line, making it harder to measure performance and make informed decisions.
Getting GTM properly installed on WordPress is one of the most important foundational steps for anyone serious about understanding their site's performance. In this guide, we'll walk you through all the steps from creating your GTM account to getting it live on your WordPress site.
Key Takeaway:
Installing Google Tag Manager on a WordPress site centralizes all tracking codes, including Google Analytics and Facebook Pixel, in a single dashboard. It allows users to add, update, or remove tags without editing theme files or relying on multiple plugins. Proper setup and verification ensure accurate data collection and reduce errors across the site.
What is Google Tag Manager?
Google Tag Manager (GTM) is a free tag management system from Google that lets you manage tracking codes on your website from a single dashboard. A tag is a small piece of code used for analytics, advertising, or conversion tracking, such as the Google Analytics tag or the Facebook Pixel.
Without it, each tag must be manually added to your WordPress theme files, a time-consuming and error-prone process. It simplifies this process: you add a single container code to your site, then manage all tags from the GTM interface. To ensure the container and all scripts load correctly, it’s important that your WordPress site is properly maintained and supported. This approach improves efficiency, reduces the risk of mistakes, and makes it easier to scale tracking across multiple tools.
What You’ll Need Before You Start
Before installing Google Tag Manager on your WordPress site, ensure you have the following:
- A Google account: Required to create and manage your GTM container. A free Gmail account is sufficient.
- Admin access to your WordPress site: Needed to add the container code or install a plugin.
- Publicly accessible WordPress site: The site cannot be in maintenance mode or password-protected, as GTM needs to load on live pages.
- Child theme (for manual method only): If you plan to add GTM code manually, a child theme ensures that updates to your main theme do not overwrite the changes.
Having these prepared before you begin will make the installation process smoother and help avoid common setup issues.
Create Your GTM Account and Container
Before installing Google Tag Manager on your WordPress site, you must first set up your account and container. This step provides the tracking code snippets that will be used in all installation methods.
Step 1: Go to Google Tag Manager
Visit tagmanager.google.com and sign in with your Google account. If you do not have a Google account, create one for free before proceeding.
Step 2: Create a New Account
Click the Create Account button. Complete the form:
- Account Name: Use your business or website name (e.g., “My Blog” or “Acme Store”).
- Country: Select your country from the dropdown.
- Share Data Anonymously with Google: Optional, check if you agree, or leave unchecked.
Step 3: Set Up Your Container
Scroll to the Container Setup section. A container stores all tags for a specific website. Fill in:
- Container Name: Use your website URL (e.g., “www.mysite.com”) or a memorable short name.
- Target Platform: Select Web for WordPress.
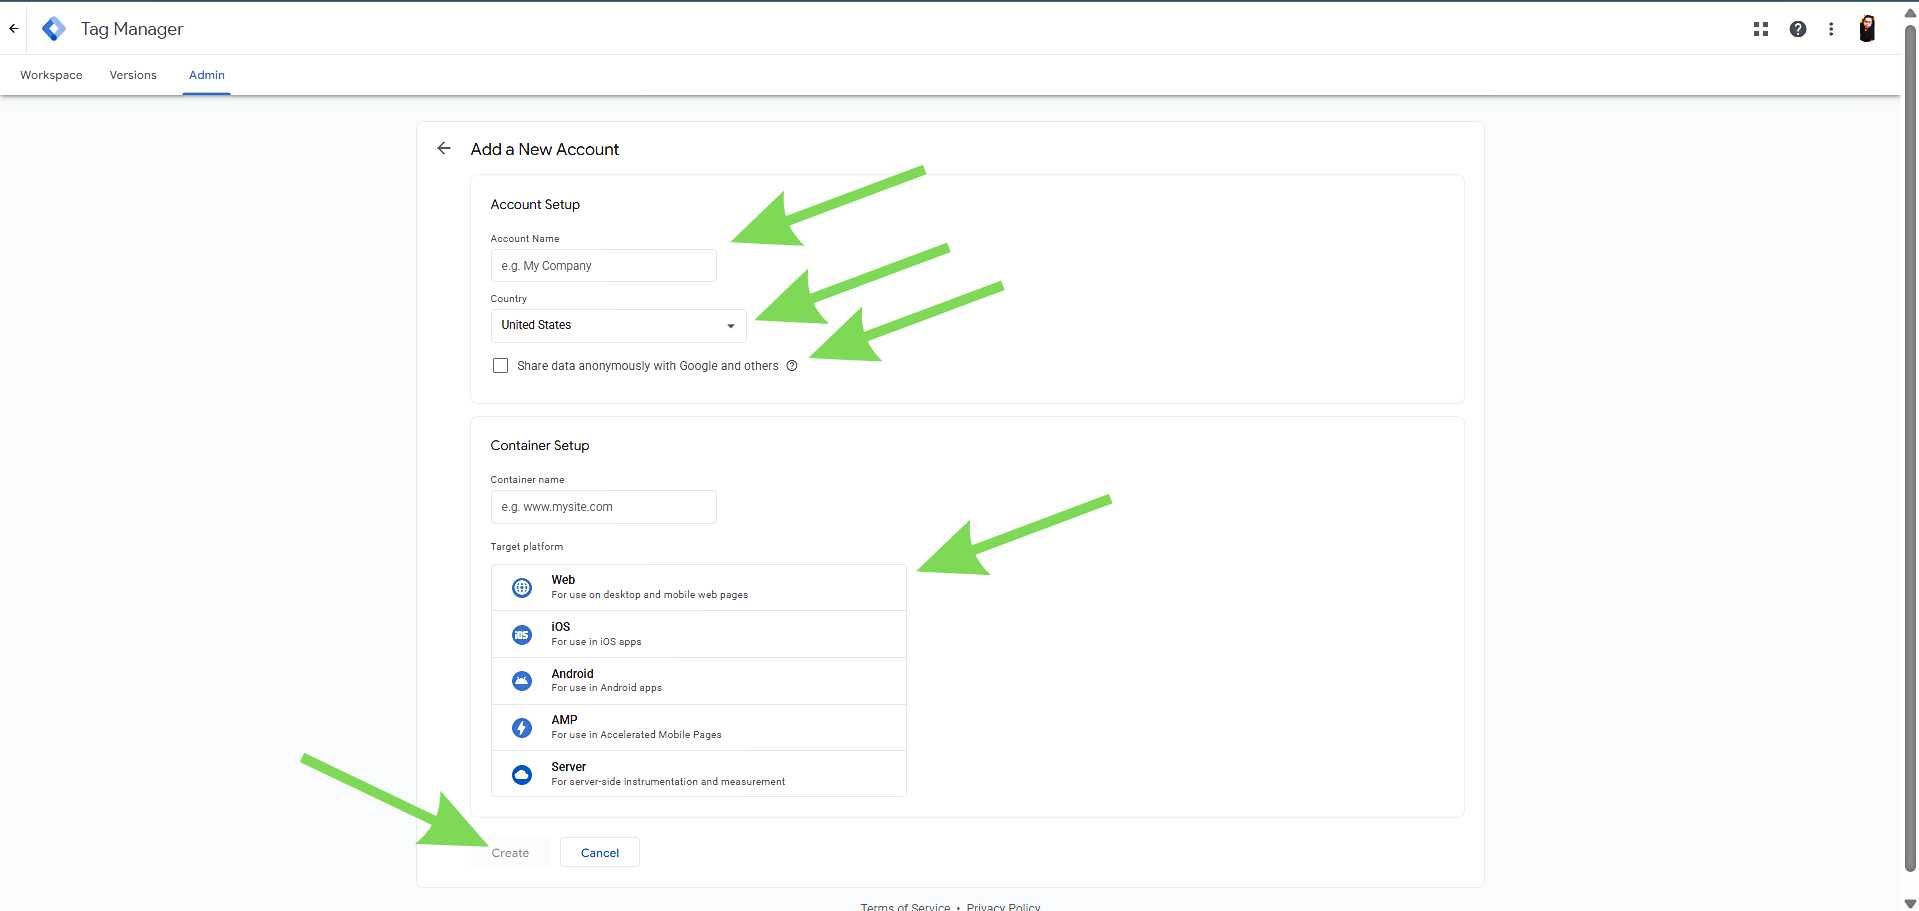
Click Create to proceed.
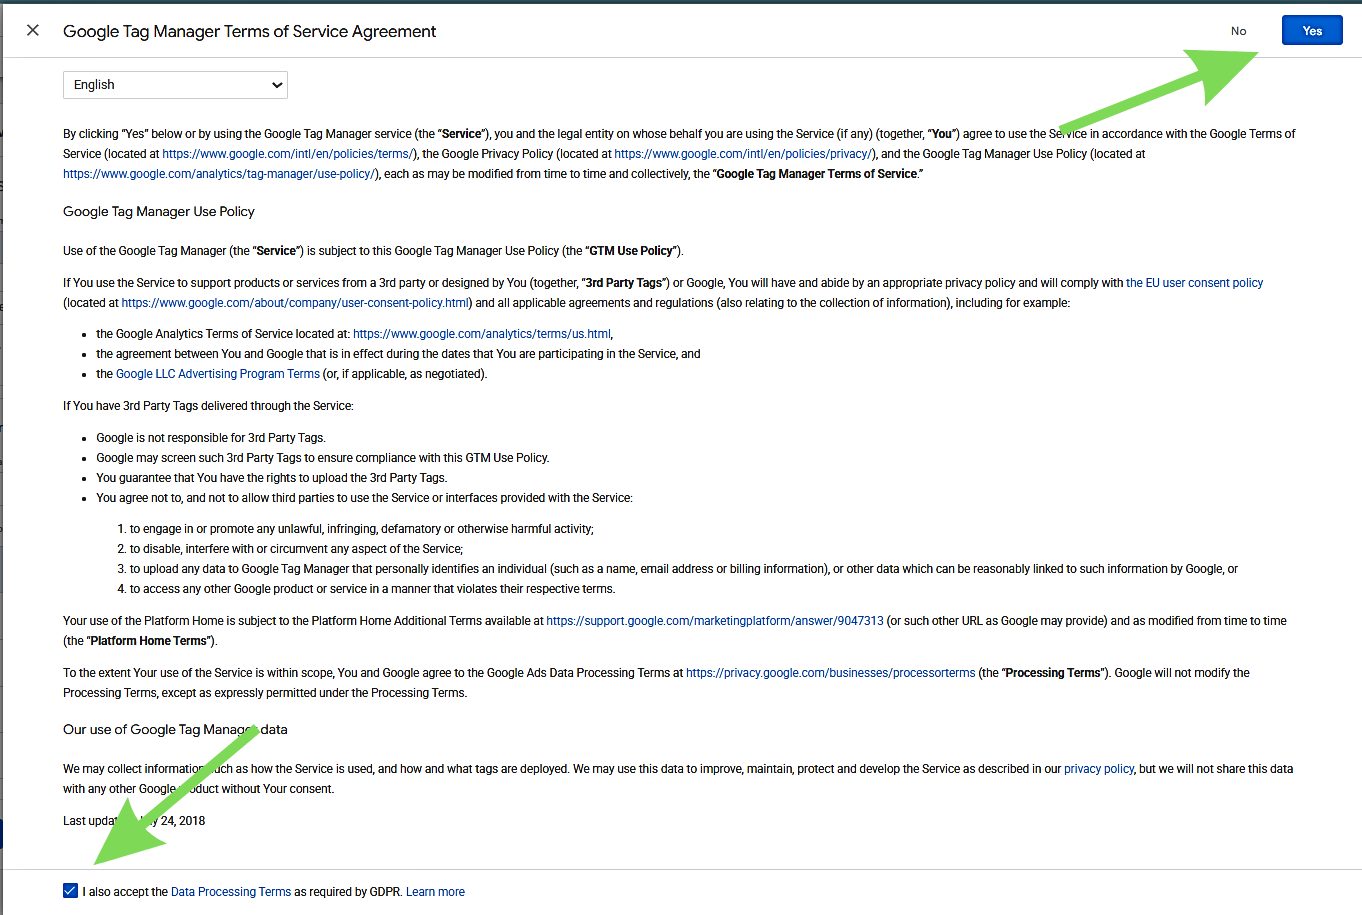
Step 4: Accept the Terms of Service
A pop-up will display the Google Tag Manager Terms of Service. Review the terms, then click Yes or I Accept to continue.
Step 5: Copy Your GTM Code Snippets
After accepting the terms, two code snippets will appear. These are required to add GTM to your WordPress site:
Snippet 1: Place in the <head> section of your site.
<!-- Google Tag Manager -->
<script>(function(w,d,s,l,i){w[l]=w[l]||[];w[l].push({„gtm.start“:
new Date().getTime(),event:„gtm.js“});var f=d.getElementsByTagName(s)[0],
j=d.createElement(s),dl=l!=„dataLayer“?'&l=„+l:“';j.async=true;j.src=
„https://www.googletagmanager.com/gtm.js?id=“+i+dl;f.parentNode.insertBefore(j,f);
} )(window,document,„script“,'dataLayer',„GTM-XXXXXXX“);</script>
<!-- End Google Tag Manager -->
Snippet 2: Place immediately after the opening <body> tag.
<!-- Google Tag Manager (noscript) -->
<noscript><iframe src="https://www.googletagmanager.com/ns.html?id=GTM-XXXXXXX"
height=„0“ width="0" style="display:none;visibility:hidden"></iframe></noscript>
<!-- End Google Tag Manager (noscript) -->
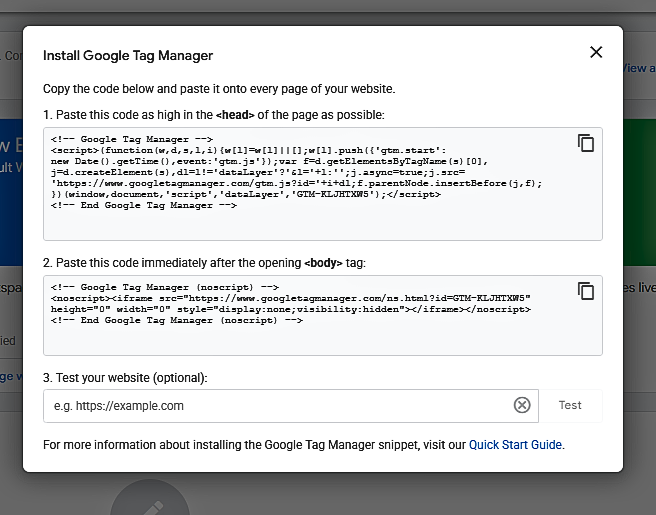
Your unique Container ID will replace GTM-XXXXXXX. Copy both snippets to a text file, or leave the browser tab open for use in the next installation steps.
Method 1: Using the GTM4WP Plugin
The GTM4WP plugin is the easiest and most reliable way to install Google Tag Manager on WordPress. It automatically handles placement of the code snippets and pushes additional data, such as post titles, categories, and author information into the GTM data layer, enabling more advanced tracking later. This method is suitable for most WordPress users.
Step 1: Log in to Your WordPress Dashboard
Access your WordPress admin panel, typically at yourwebsite.com/wp-admin. You need administrator-level access to install plugins and configure settings.
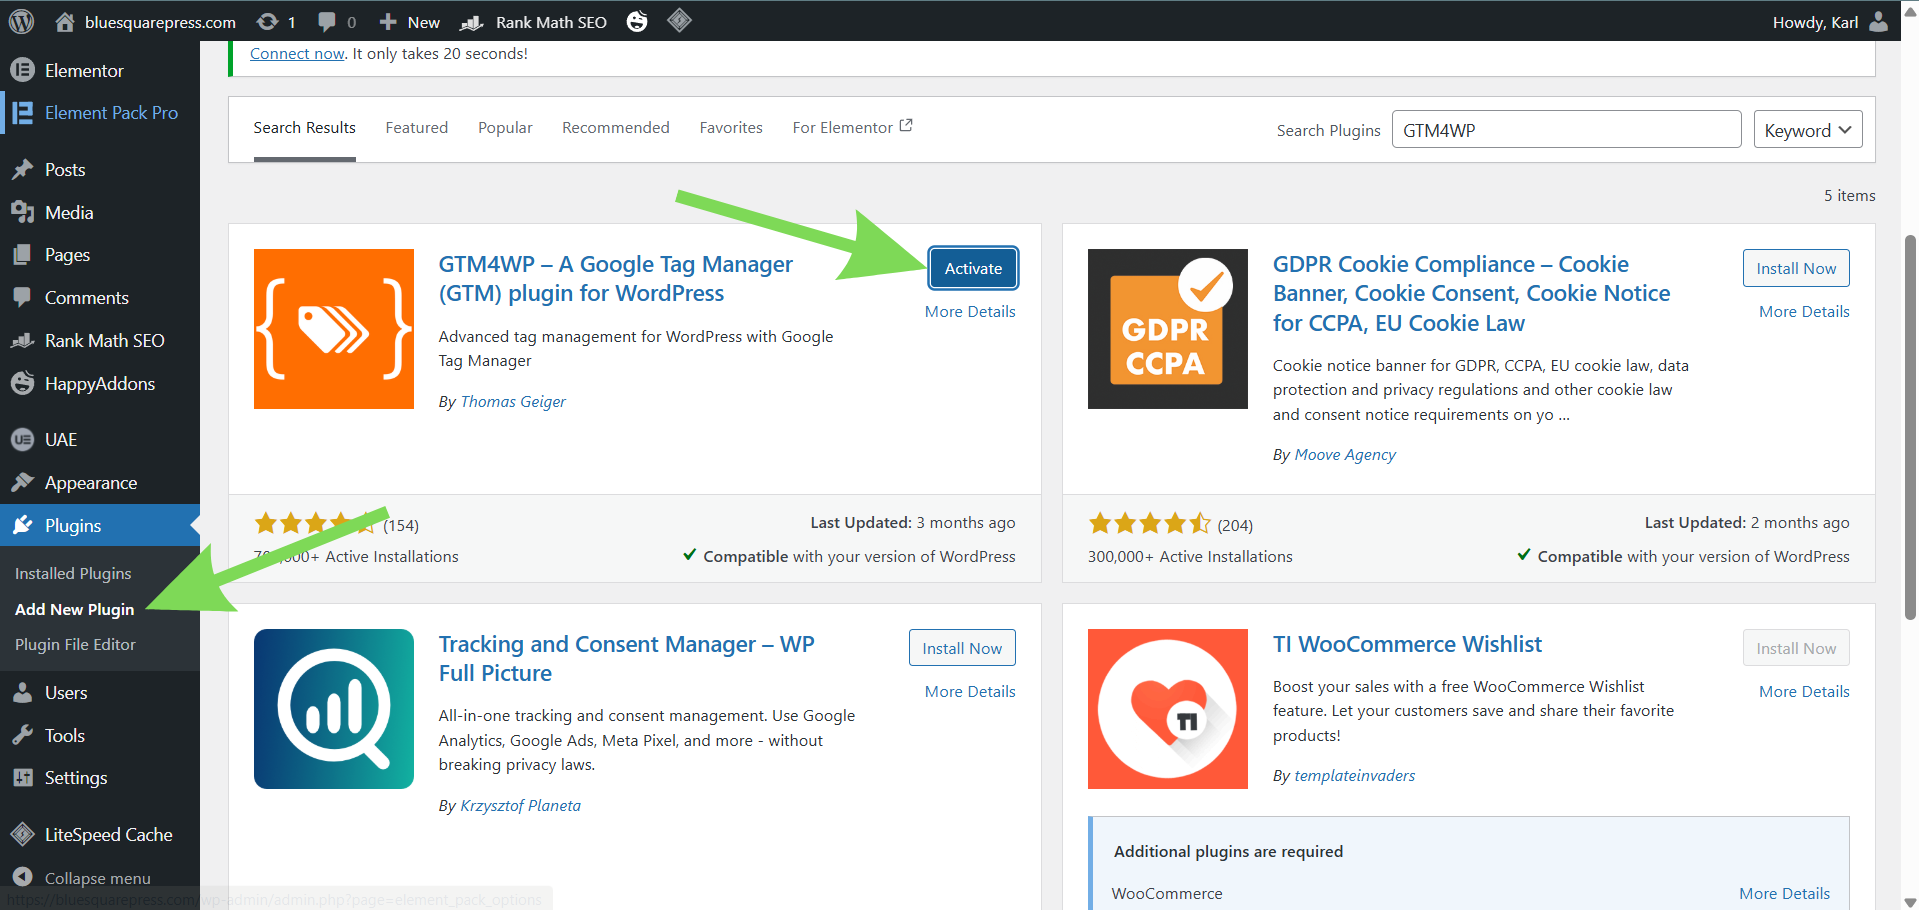
Step 2: Install the GTM4WP Plugin
In the left sidebar, go to Plugins, then Add New. Use the search bar to find GTM4WP or Google Tag Manager for WordPress by Thomas Geiger. Click Install Now, then Activate.
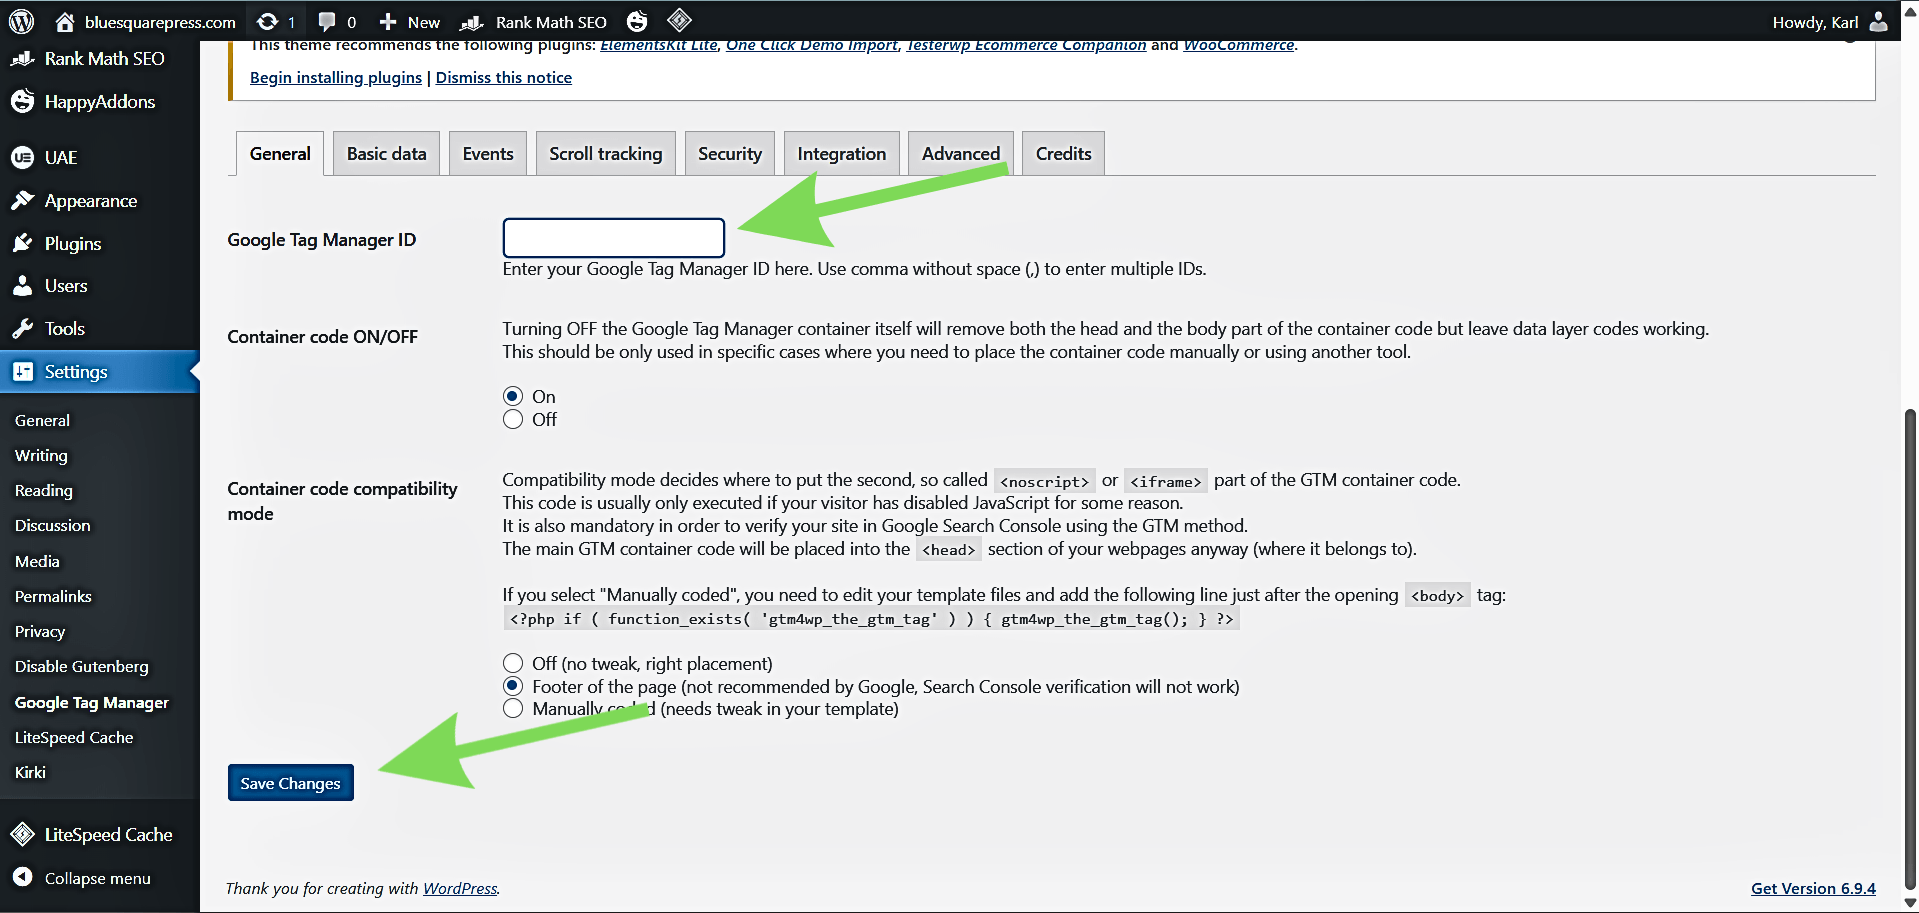
Step 3: Enter Your Container ID
After activation, navigate to Settings, Google Tag Manager in the WordPress dashboard. Paste your Container ID (e.g., GTM-XXXXXXX) into the Google Tag Manager ID field at the top of the page.
Step 4: Save Your Settings
Scroll down and click Save Changes. The plugin will now automatically insert both GTM code snippets into the correct locations on your site.
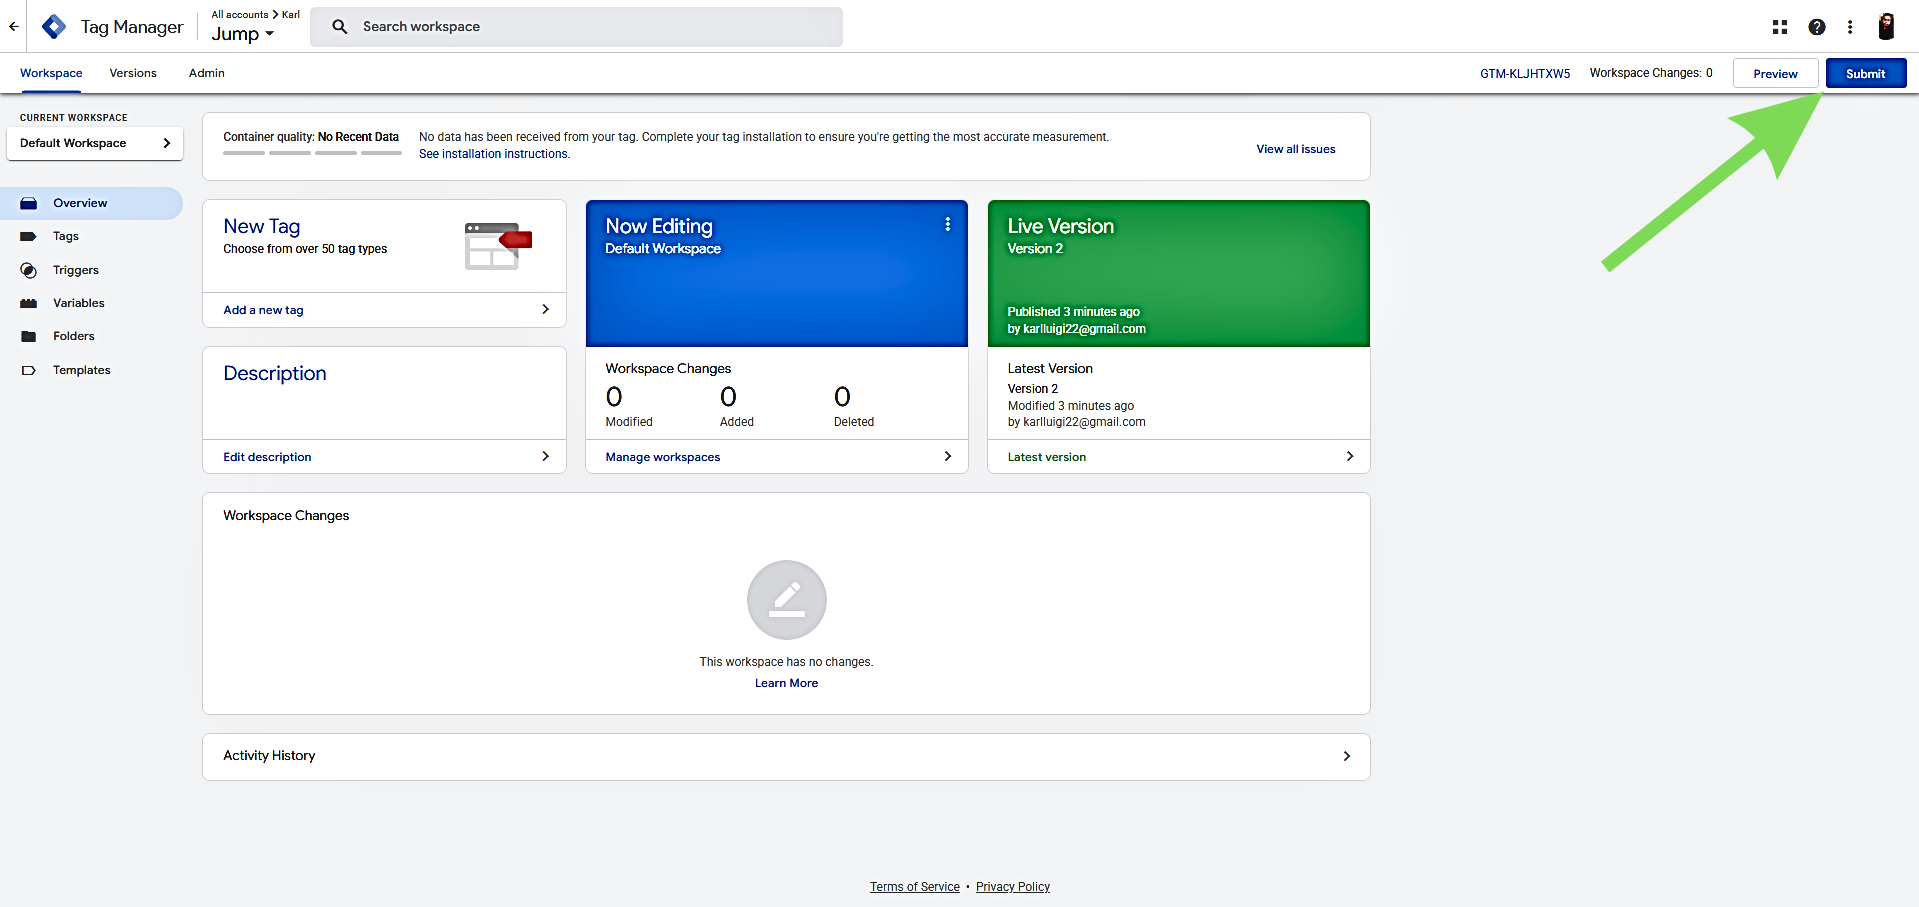
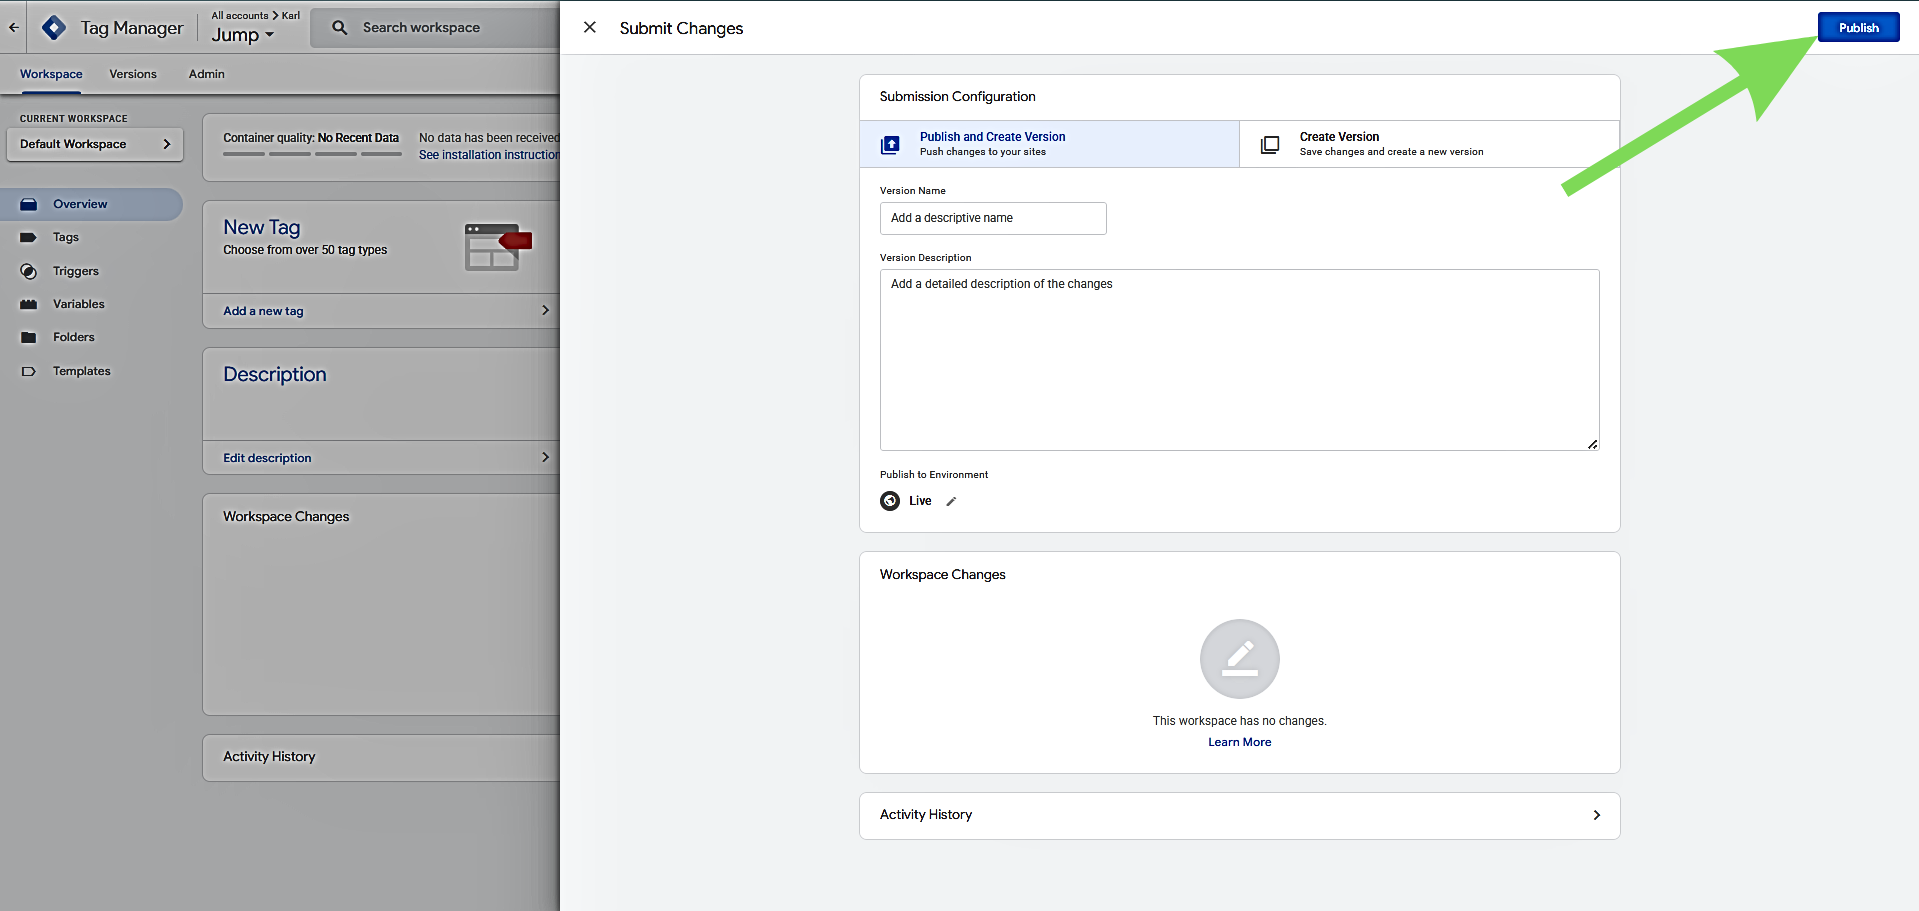
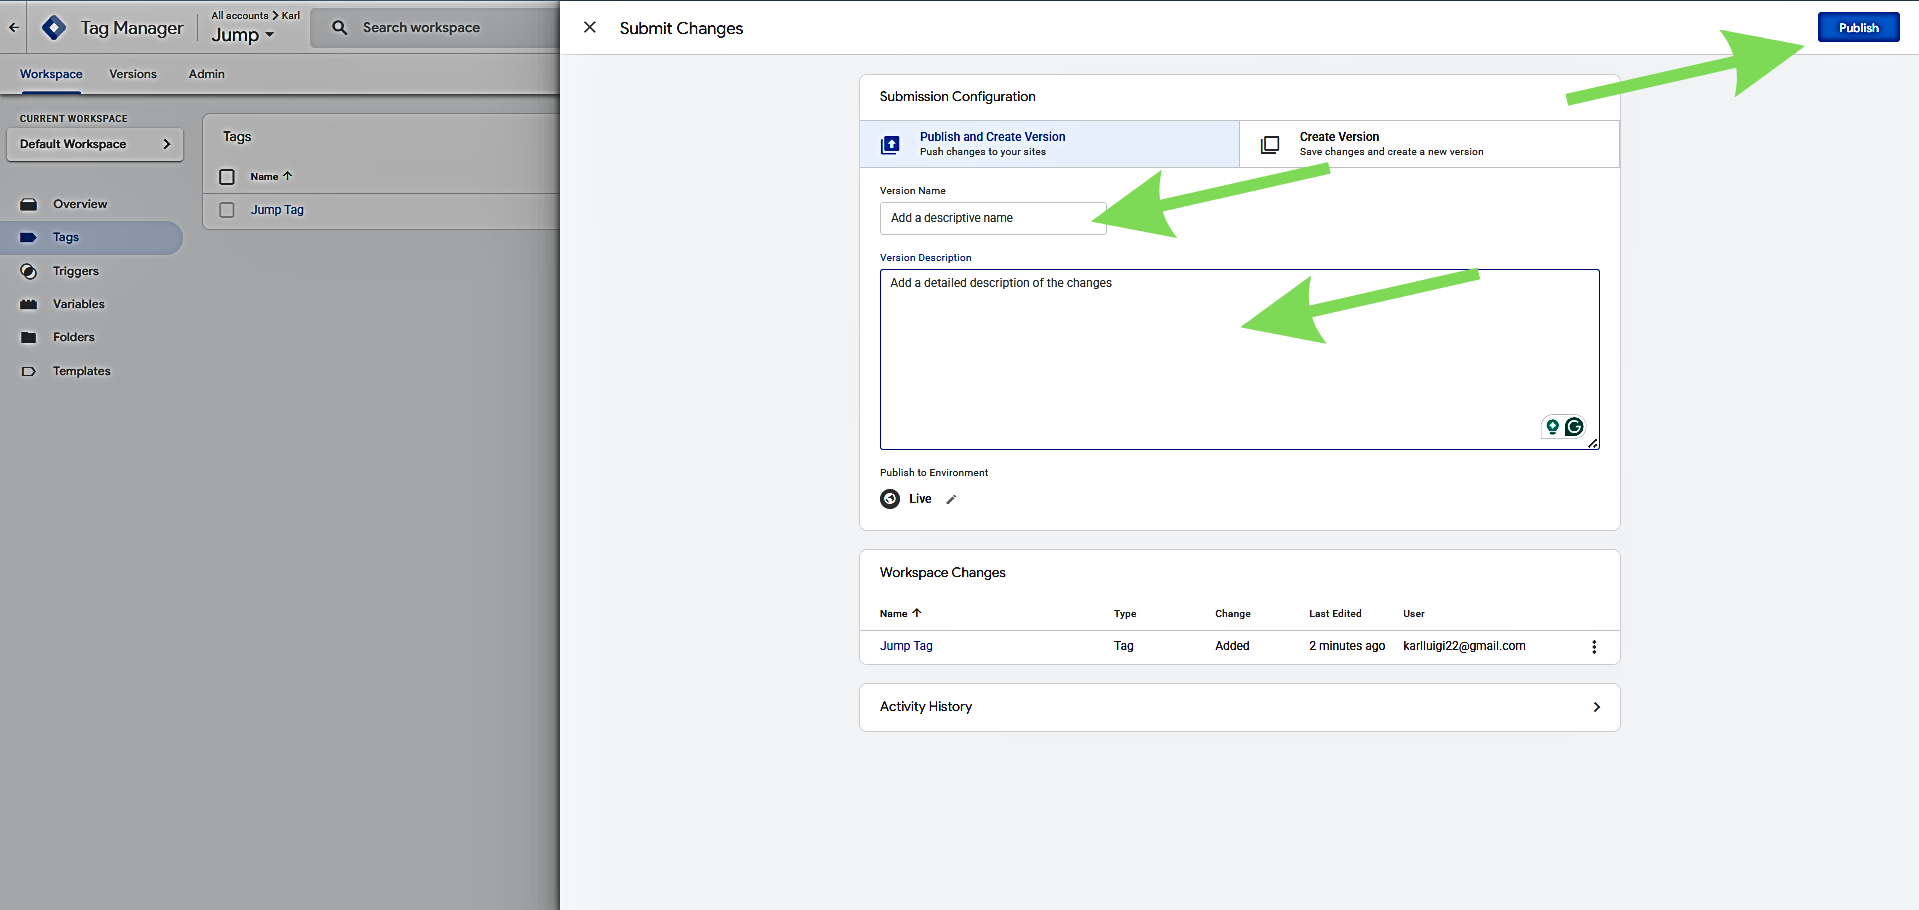
Step 5: Publish Your GTM Container
Return to your Google Tag Manager account. In the top-right corner, click Submit, then Publish to make your container live. Without publishing, tags will not fire on your site.
Method 2: Using the WPCode Plugin
This method uses the free WPCode plugin (formerly Insert Headers and Footers) to insert GTM code snippets directly into your site's header and body. It’s ideal if you prefer not to install a GTM-specific plugin or are already using WPCode for other custom scripts.
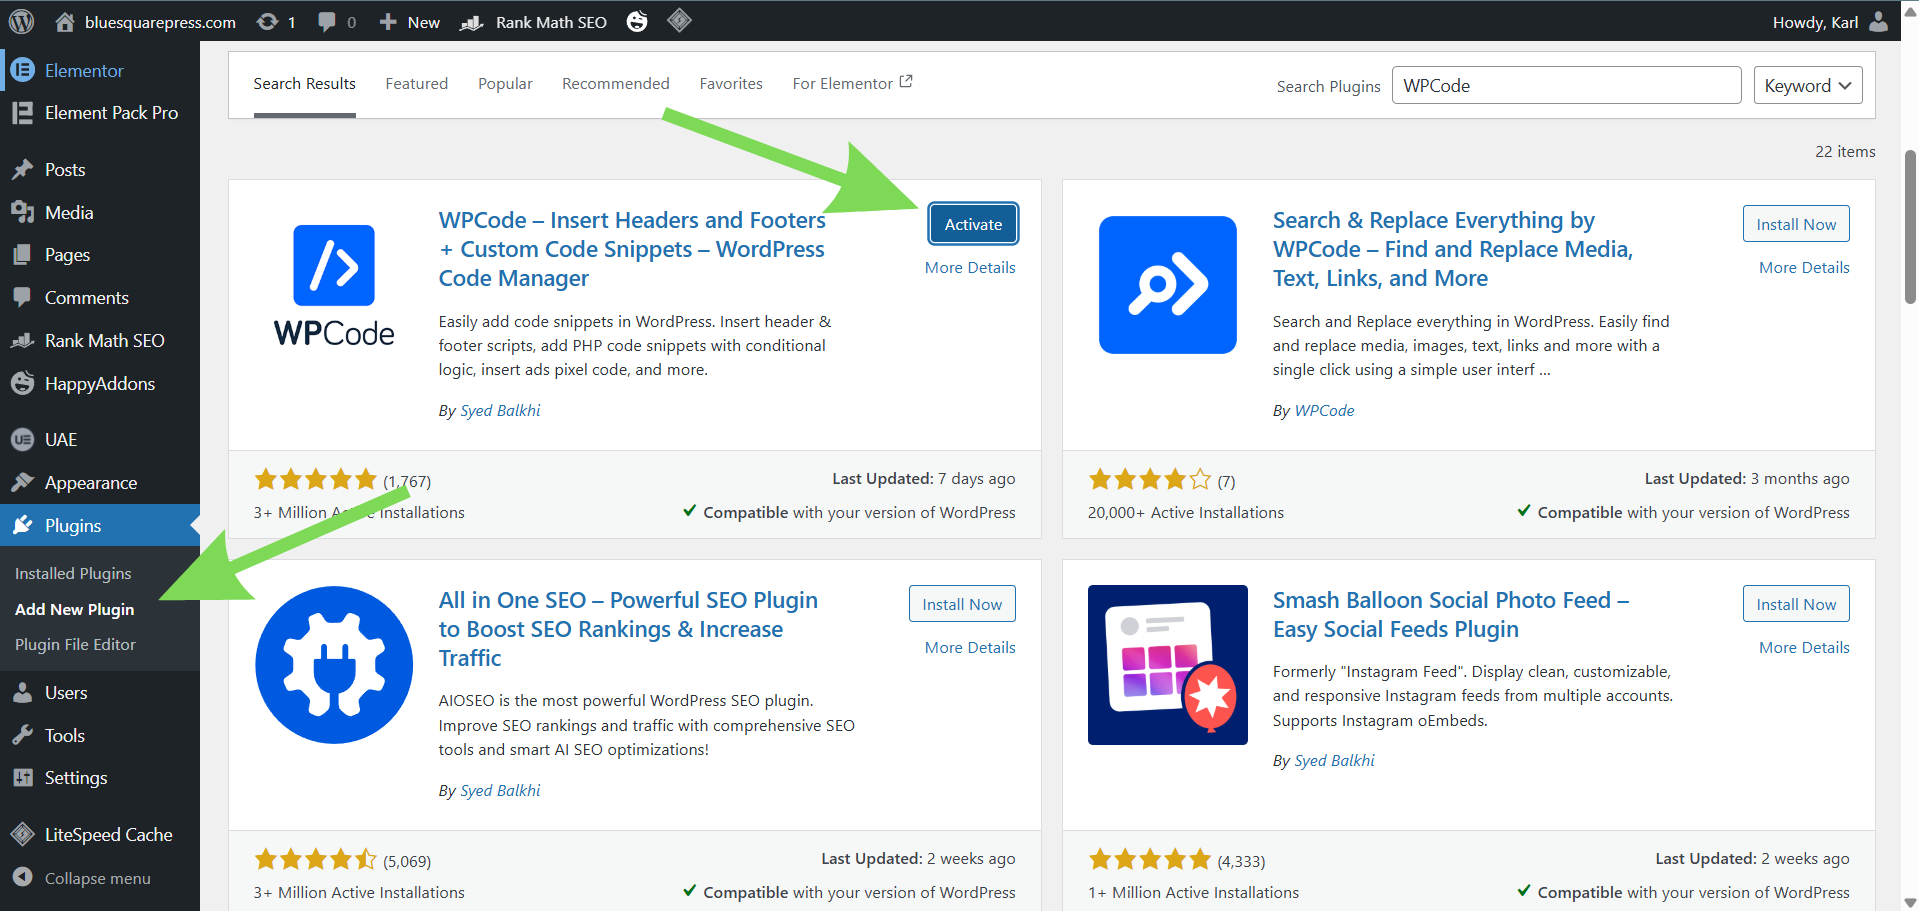
Step 1: Install the WPCode Plugin
In your WordPress dashboard, go to Plugins, then Add New. Search for WPCode, then click Install Now and Activate.
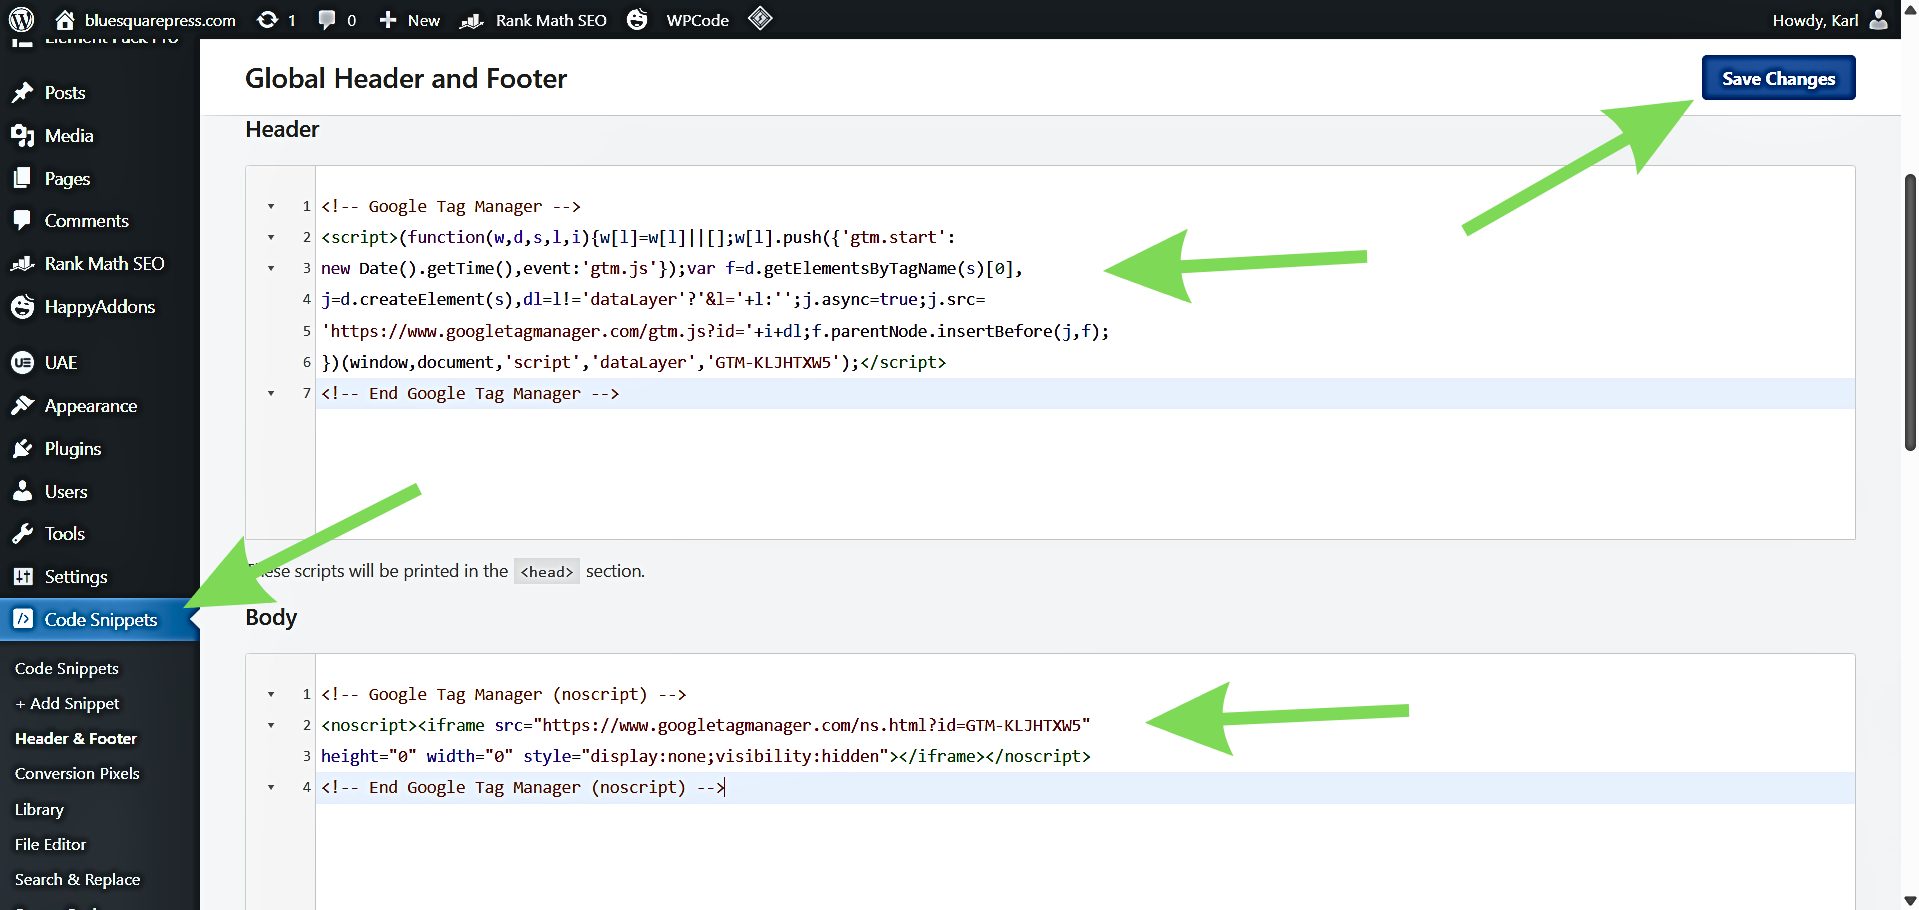
Step 2: Open Headers & Footers Settings
After activation, navigate to Code Snippets, then Headers & Footers in the dashboard sidebar. This section allows you to add scripts that load on every page.
Step 3: Paste Snippet 1 into the Header Field
In the Header text box, paste your first code snippet (the one starting with <!-- Google Tag Manager -->). This ensures the main GTM script loads inside the <head> section on every page of your site.
Step 4: Paste Snippet 2 into the Body Field
In the Body field, paste the second snippet (the <noscript> iframe). This provides a fallback for users with JavaScript disabled.
Note: If your version of WPCode does not show a Body field, you may paste Snippet 2 into the Footer field. While not ideal, it will still function correctly in most cases.
Step 5: Save Your Changes
Click Save Changes. WPCode will now automatically inject both GTM snippets on every page, ensuring consistent tracking across your site.
Step 6: Publish Your Container
Return to your Google Tag Manager account. Click Submit, then Publish to make your container live. Without this step, your tags will not fire on your site.
Method 3: Manually via Theme Files
This method requires editing WordPress theme files directly, giving full control over GTM placement. It is recommended only for users comfortable with code, as a single mistake can break your site. Beginners should use Method 1 or 2.
Important: Always create a full backup of your WordPress site before editing theme files. Ensure you are using a child theme, as edits to a parent theme will be overwritten during updates.
Step 1: Verify Your Child Theme Is Active
Ensure a child theme is active before proceeding. If you do not have one, create a child theme first. Editing a parent theme directly will cause changes to be lost when the theme updates. Free child theme creator plugins are available in the WordPress plugin directory if needed.
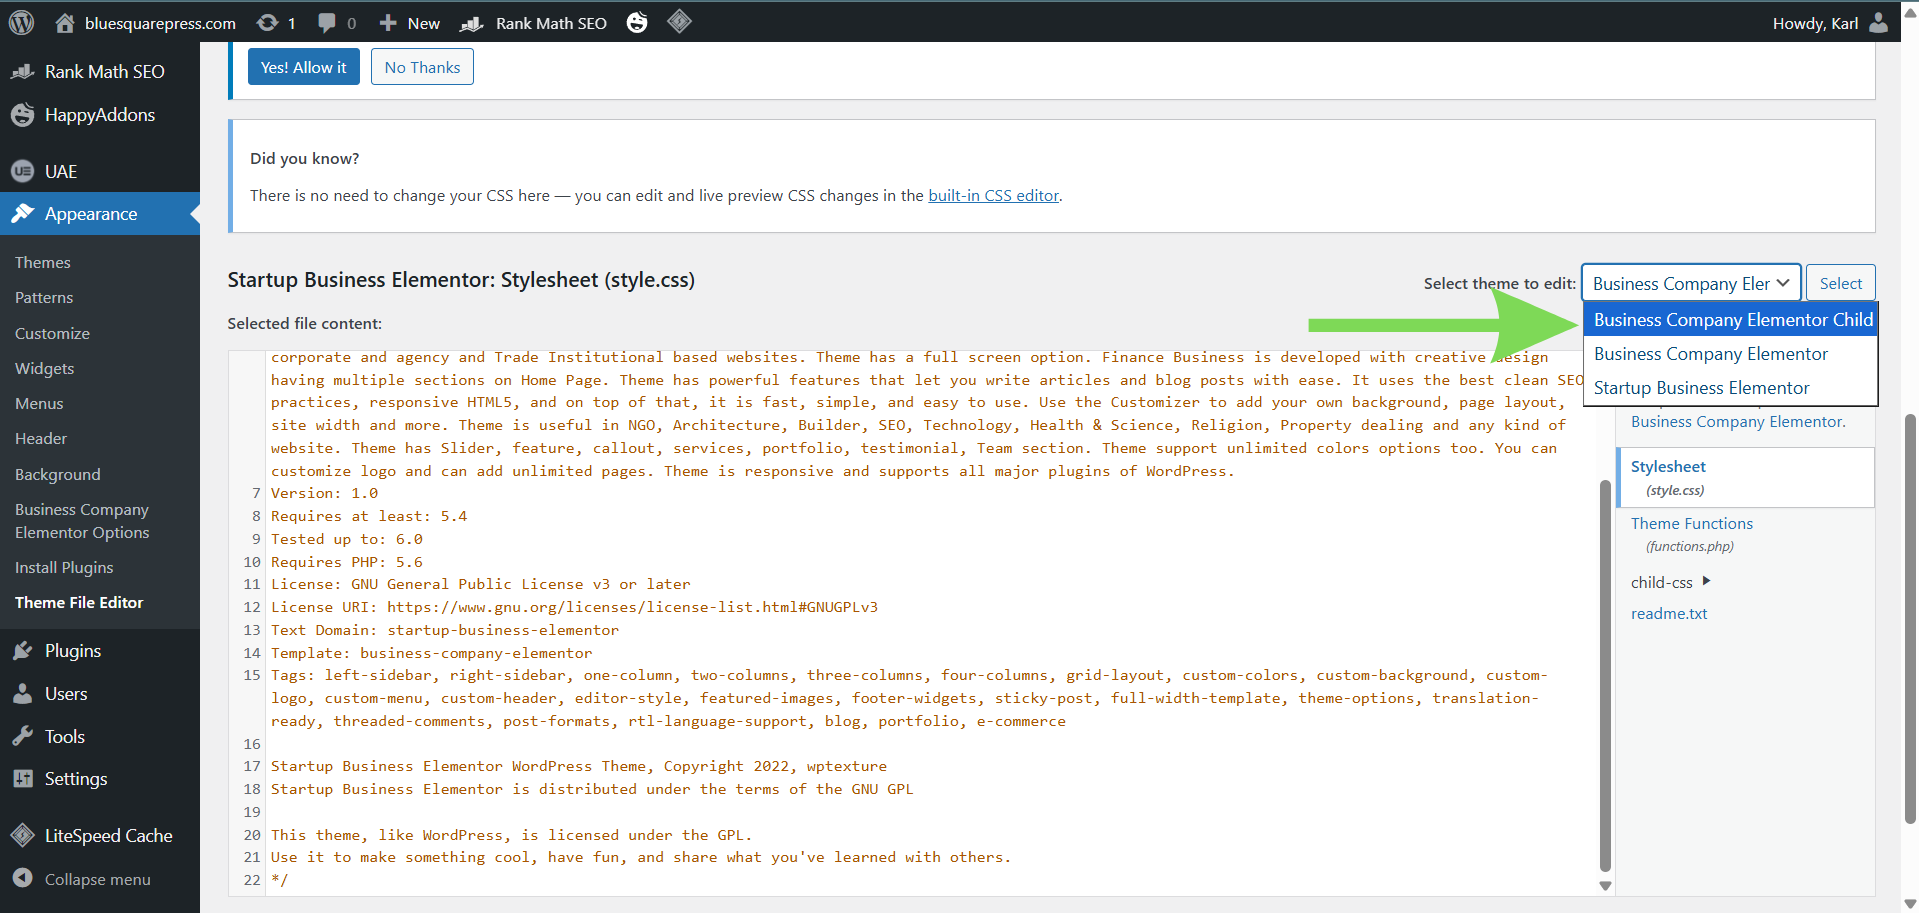
Step 2: Open the Theme File Editor
In your WordPress dashboard, navigate to Appearance, Theme File Editor (sometimes labeled Theme Editor). You may see a warning about editing theme files; acknowledge it to continue.
Step 3: Open the header.php File
From the list of theme files on the right-hand side, select the header.php file. This file contains the opening <head> and <body> tags where GTM code must be inserted.
Step 4: Paste Snippet 1 After the Opening <head> Tag
Locate the opening <head> tag at the top of the file. Immediately after it, paste your first code snippet:
<head>
<!-- Google Tag Manager -->
<script>(function(w,d,s,l,i){...})</script>
<!-- End Google Tag Manager -->
This ensures the main GTM script loads on every page.
Step 5: Paste Snippet 2 After the Opening <body> Tag
Locate the opening <body> tag, or use the wp_body_open() hook if your theme supports it. Paste the second snippet immediately after:
<body>
<!-- Google Tag Manager (noscript) -->
<noscript><iframe src="..."></iframe></noscript>
<!-- End Google Tag Manager (noscript) -->
Tip: Some themes separate the <body> tag into another file. If you cannot locate it in header.php, check other theme files or insert the snippet using the wp_body_open hook in functions.php.
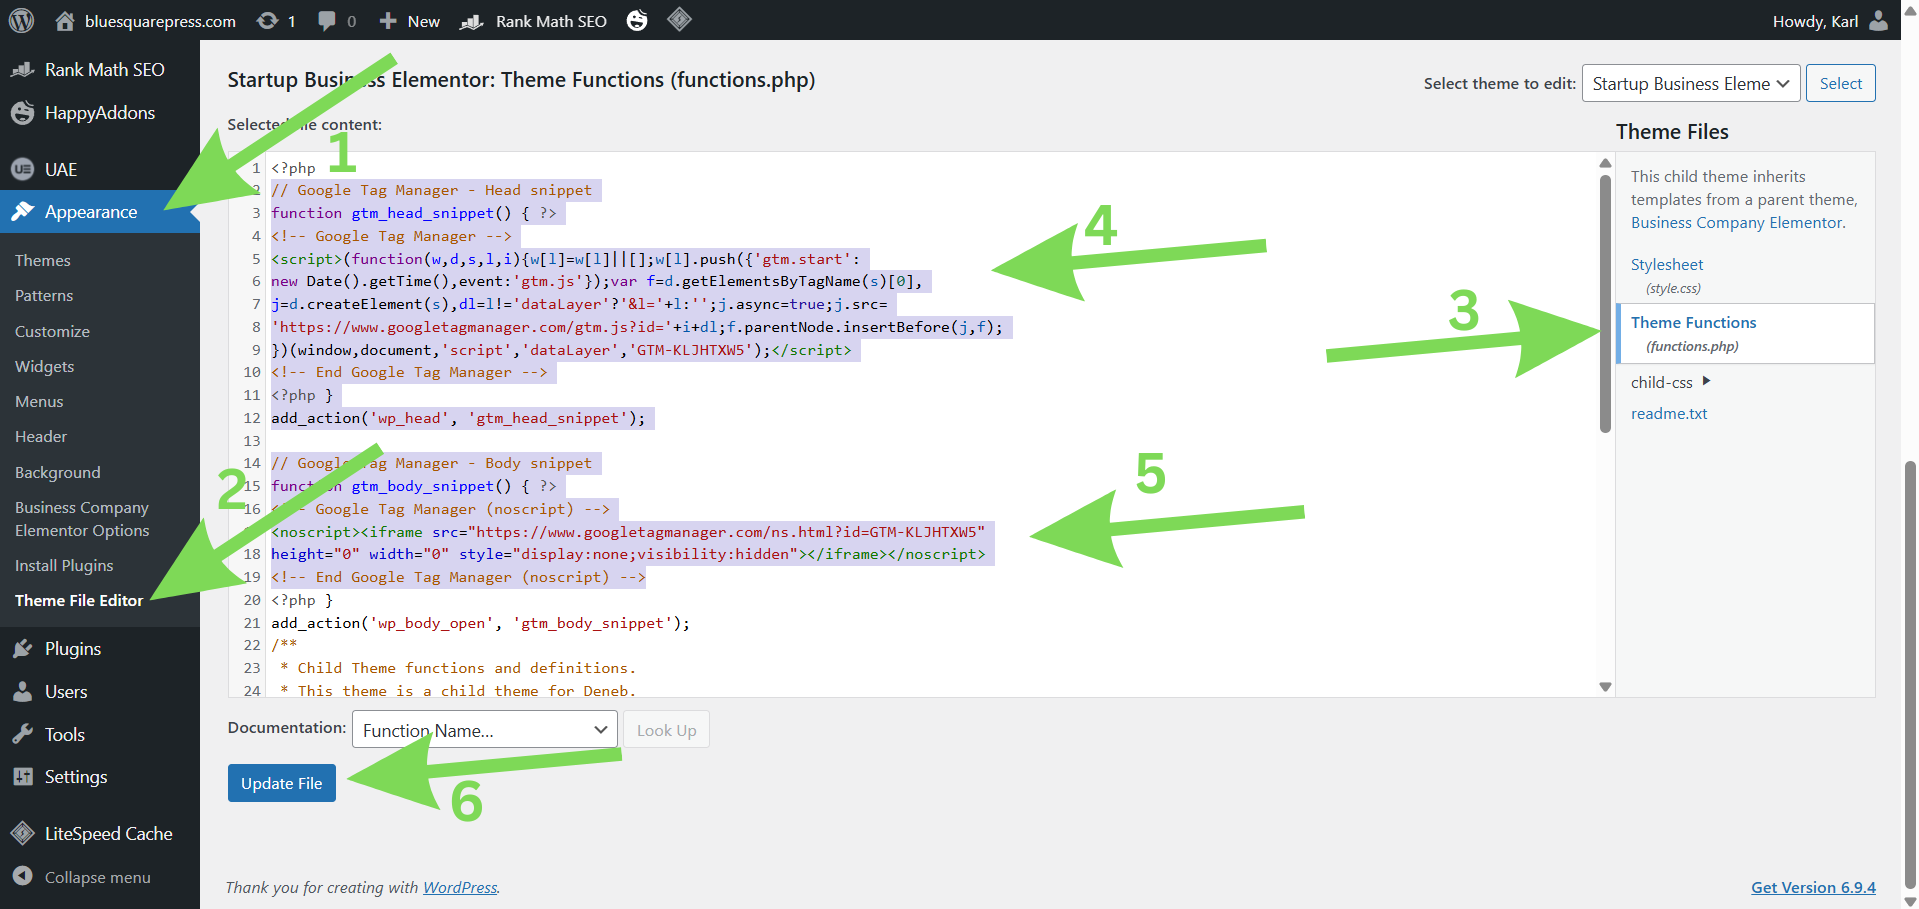
Step 6: Save Your Changes
Click Update File to save edits. WordPress will confirm the update. If an error occurs, verify that no existing code was accidentally deleted.
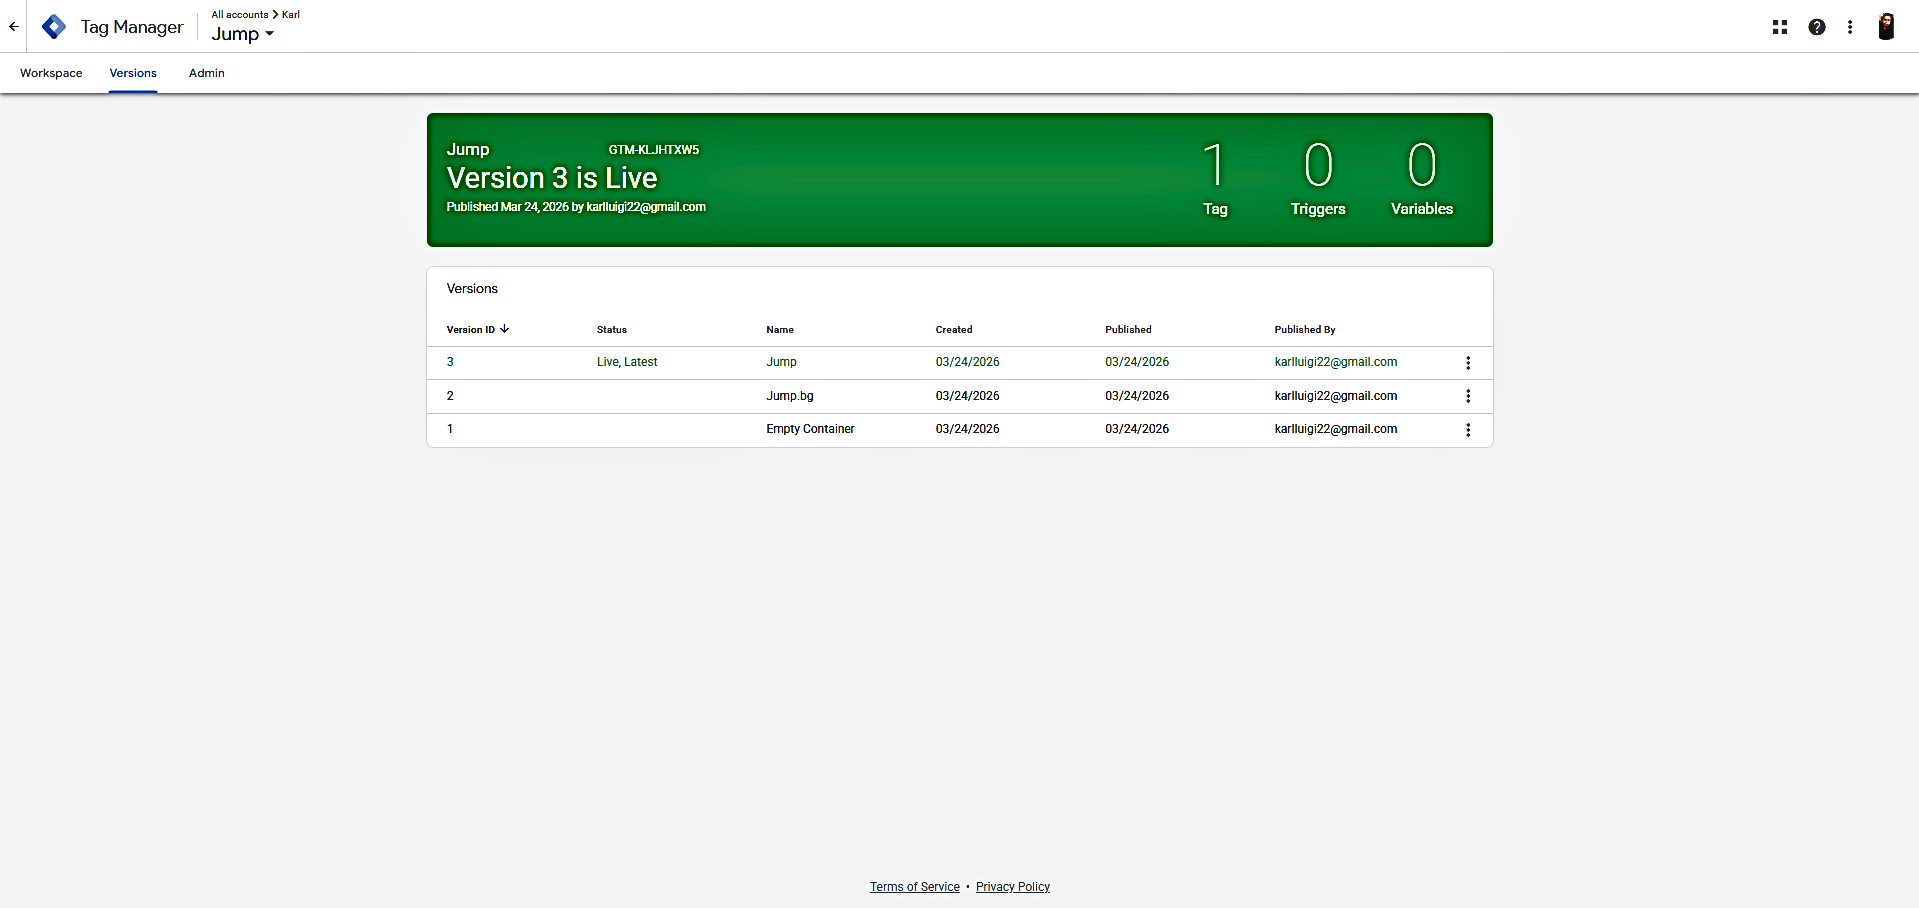
Step 7: Publish Your Container
Return to your Google Tag Manager account, click Submit, then Publish to activate your container. Without publishing, your tags will not fire.
How to Verify GTM Is Working
After installing Google Tag Manager, it’s important to confirm that your container is correctly loaded on your WordPress site. This ensures your tags will fire as expected.
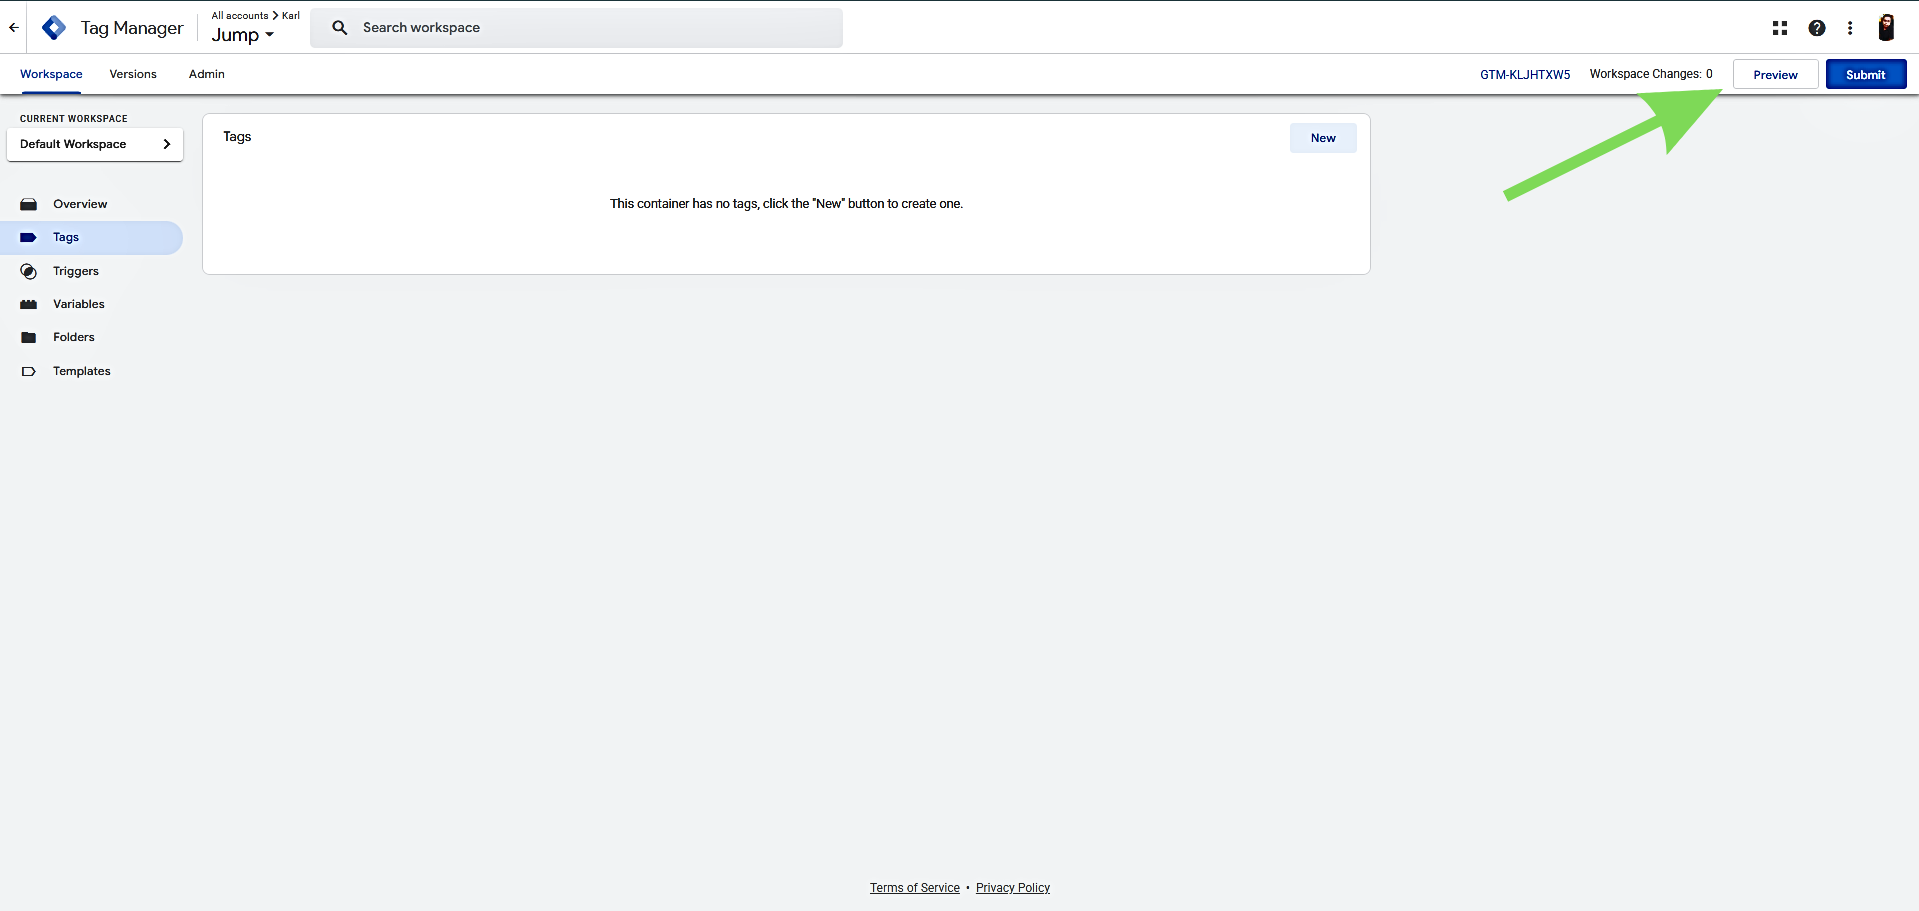
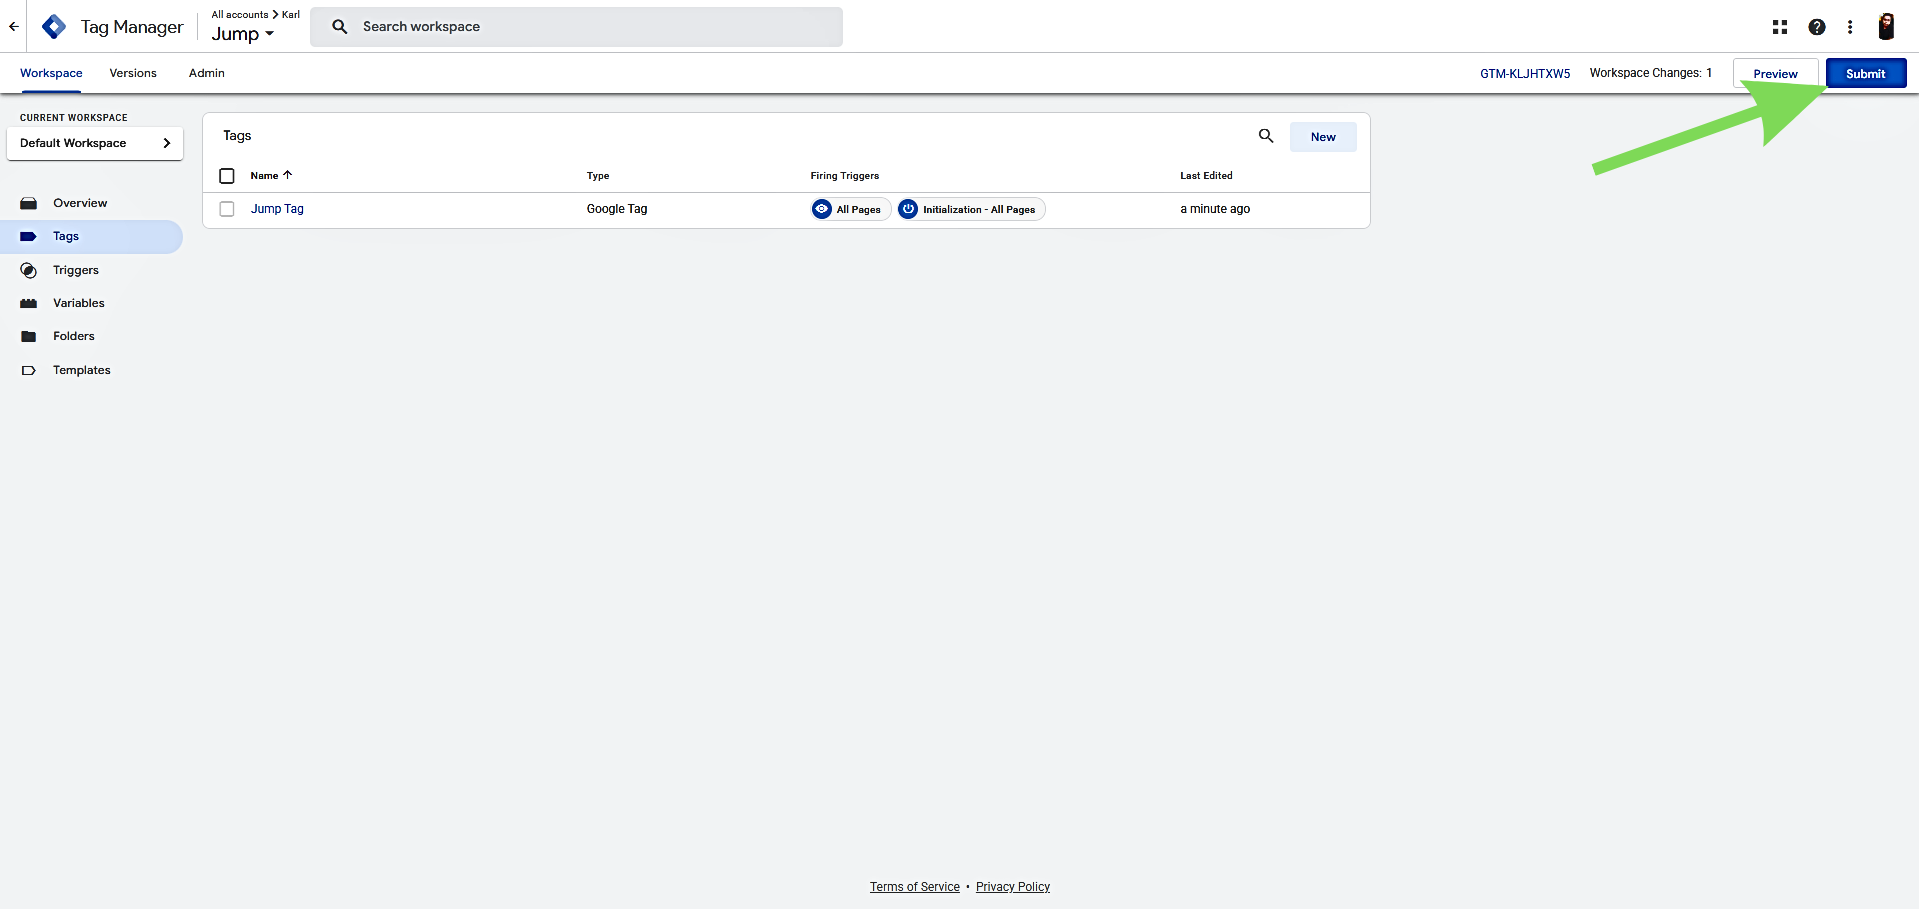
Step 1: Enable GTM Preview Mode
In your Google Tag Manager workspace, click the Preview button in the top-right corner. This launches Tag Assistant, a debugging tool that lets you inspect GTM activity on your site in real time.
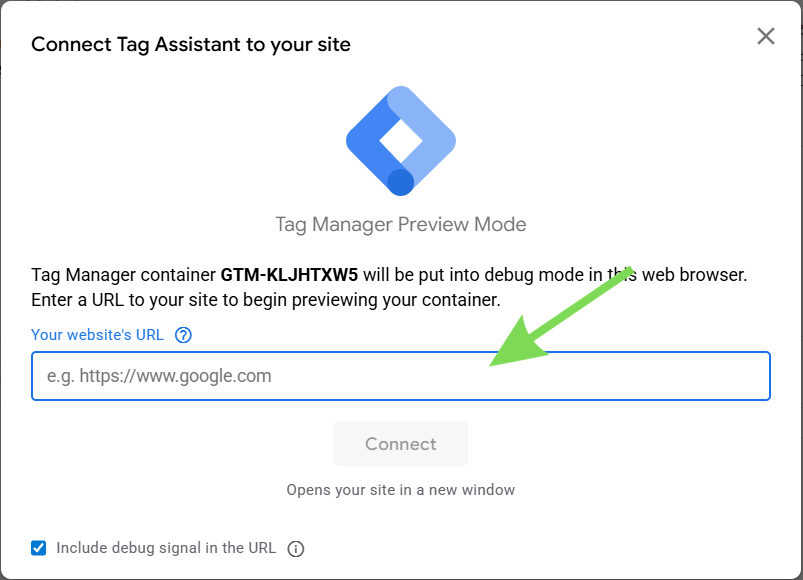
Step 2: Connect to Your Website
Enter your full website URL (e.g., https://www.yourwebsite.com) and click Connect. A new browser tab will open, displaying your site with Tag Assistant active.
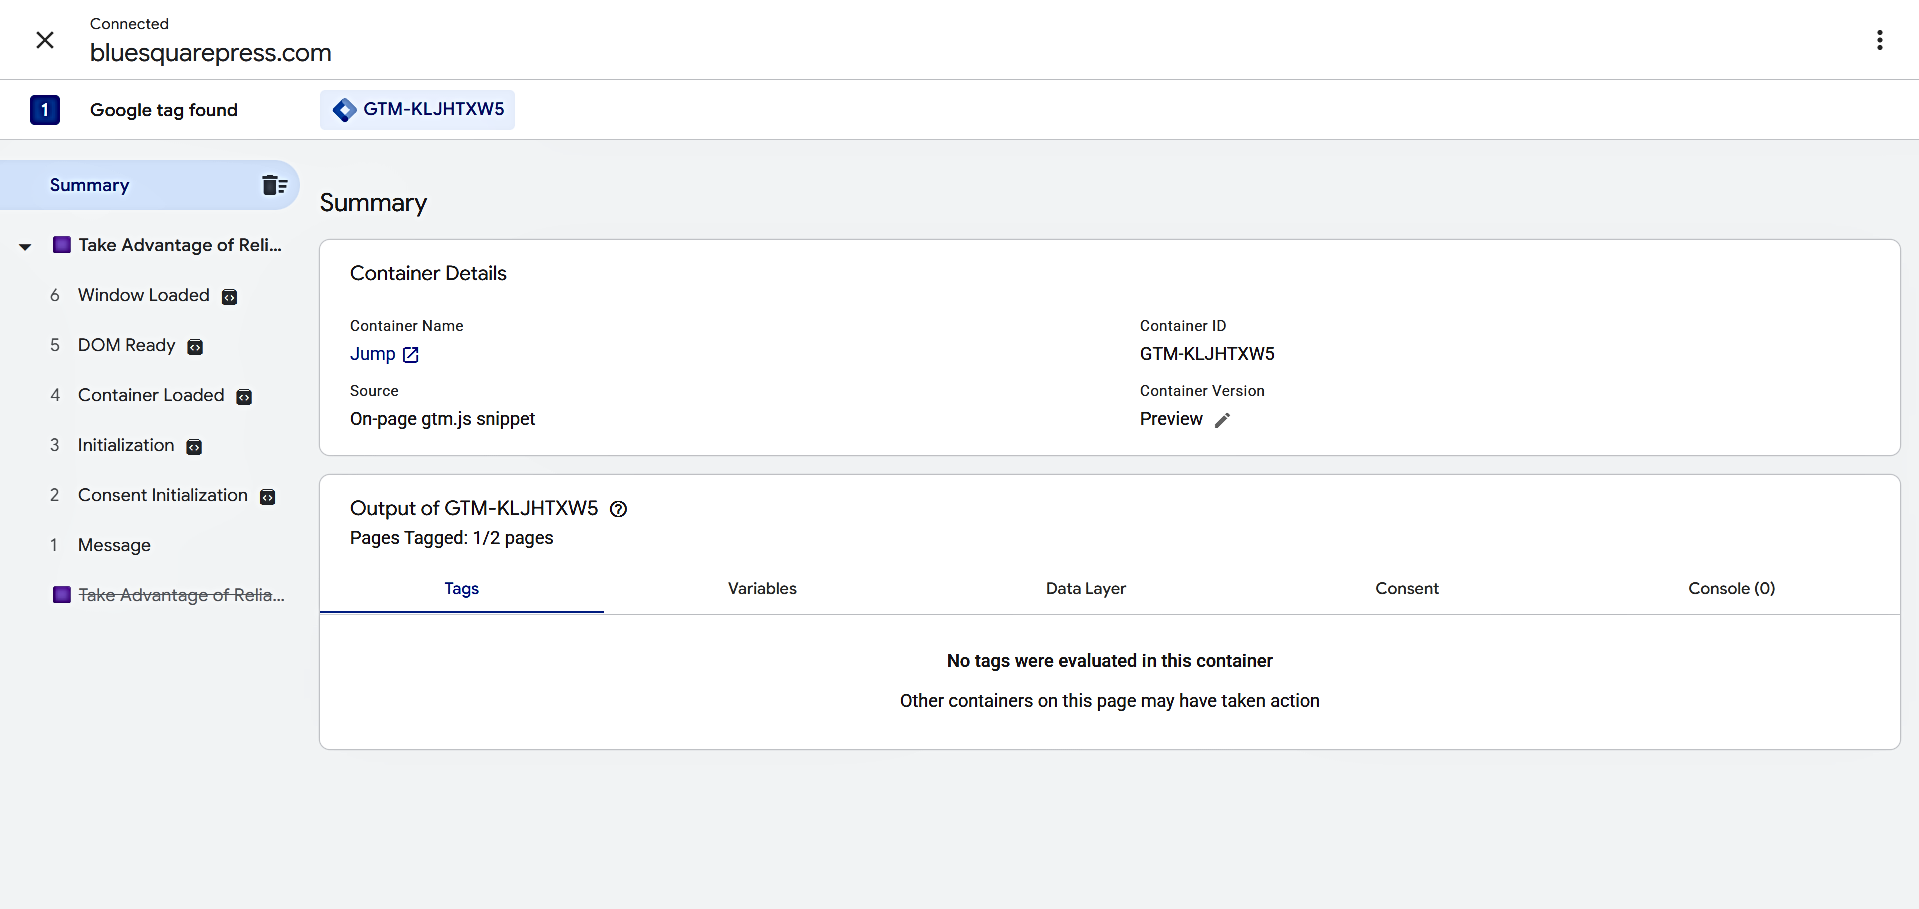
Step 3: Inspect the Tag Assistant Panel
If GTM is installed correctly, a Tag Assistant panel will appear at the bottom of your website. It should display “Tag Manager found” along with your Container ID. This confirms that GTM is running properly.
Step 4: Exit Preview Mode
After verifying if it is working, click the X button in Tag Assistant to exit Debug mode. Your site continues to run GTM live.
Troubleshooting
If it is not detected:
- Confirm that you published your container in GTM (Submit, then Publish).
- Verify that both GTM code snippets are correctly placed on your site.
- Make sure your WordPress site is publicly accessible and not in maintenance mode.
Adding Your First Tag with Google Analytics 4 (GA4)
With Google Tag Manager installed, you can start adding tags to track activity on your WordPress site. GA4 is typically the first tag most users implement.
Prerequisite: You must have a GA4 property set up and your Measurement ID ready (e.g., G-XXXXXXXXXX).
Step 1: Go to Tags in GTM
In your GTM dashboard, click Tags in the left-hand menu, then click New to create a new tag.
Step 2: Name Your Tag
Click Untitled Tag at the top left, then enter a descriptive name, such as GA4, All Pages. Clear names make it easier to manage multiple tags later.

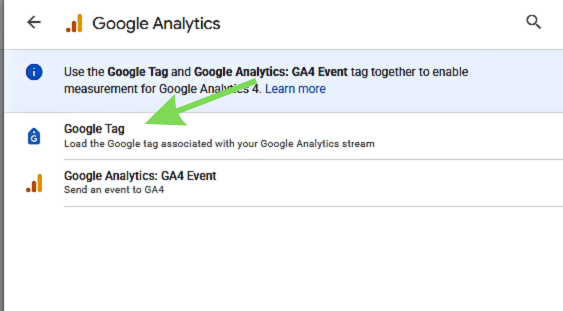
Step 3: Choose the Tag Type
Click the Tag Configuration box. From the list of tag types, select Google Analytics: GA4 Configuration. This ensures the tag is set up specifically for GA4 tracking.

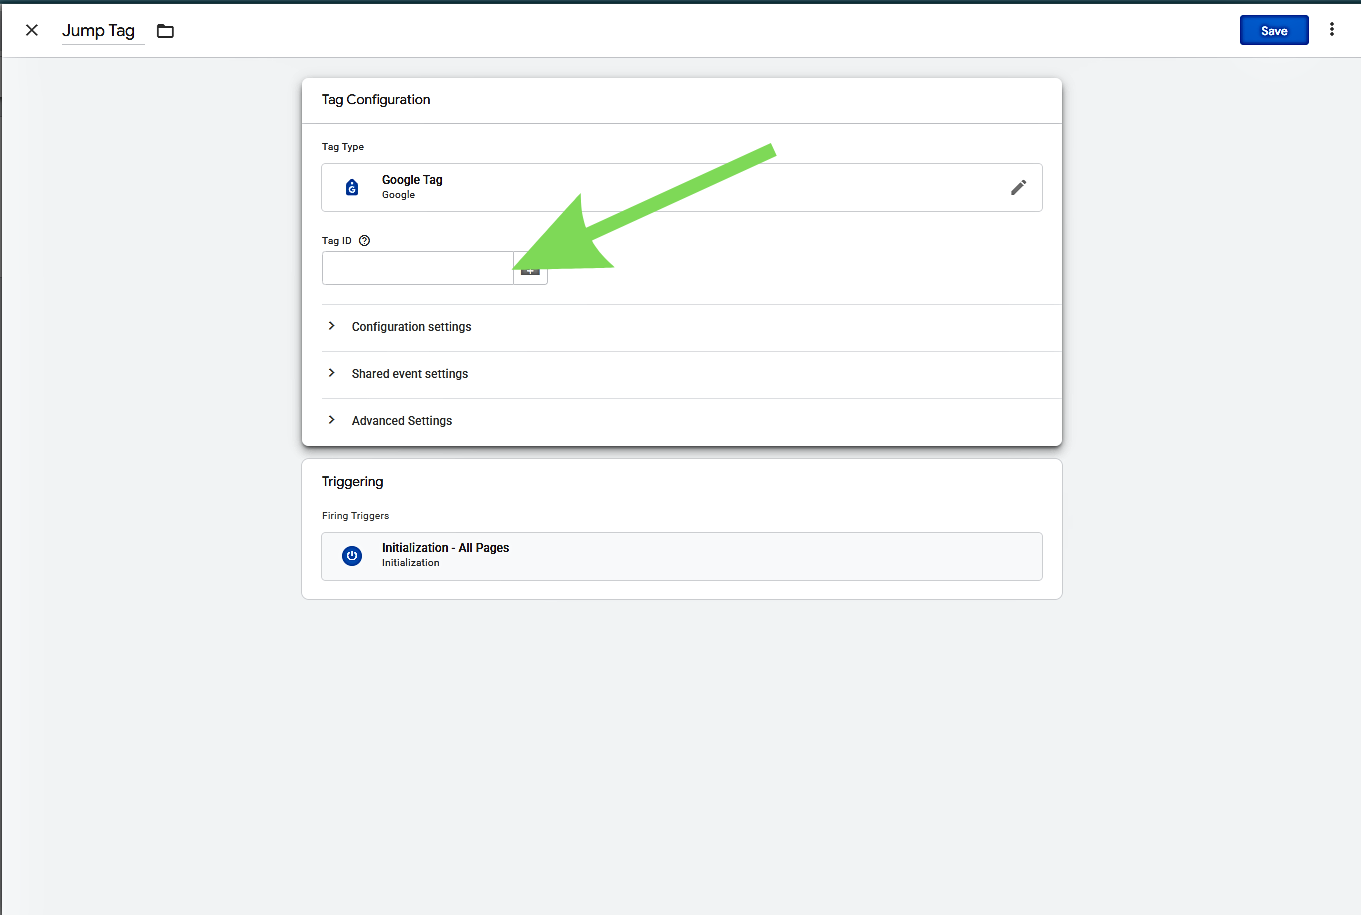
Step 4: Enter Your Measurement ID
Paste your GA4 Measurement ID (e.g., G-XXXXXXXXXX) into the Measurement ID field. This links GTM to your GA4 property so data is sent correctly.
Step 5: Set the Trigger
Click the Triggering box and select All Pages. This tells GTM to fire the GA4 tag on every page of your WordPress site, ensuring full site-wide tracking.
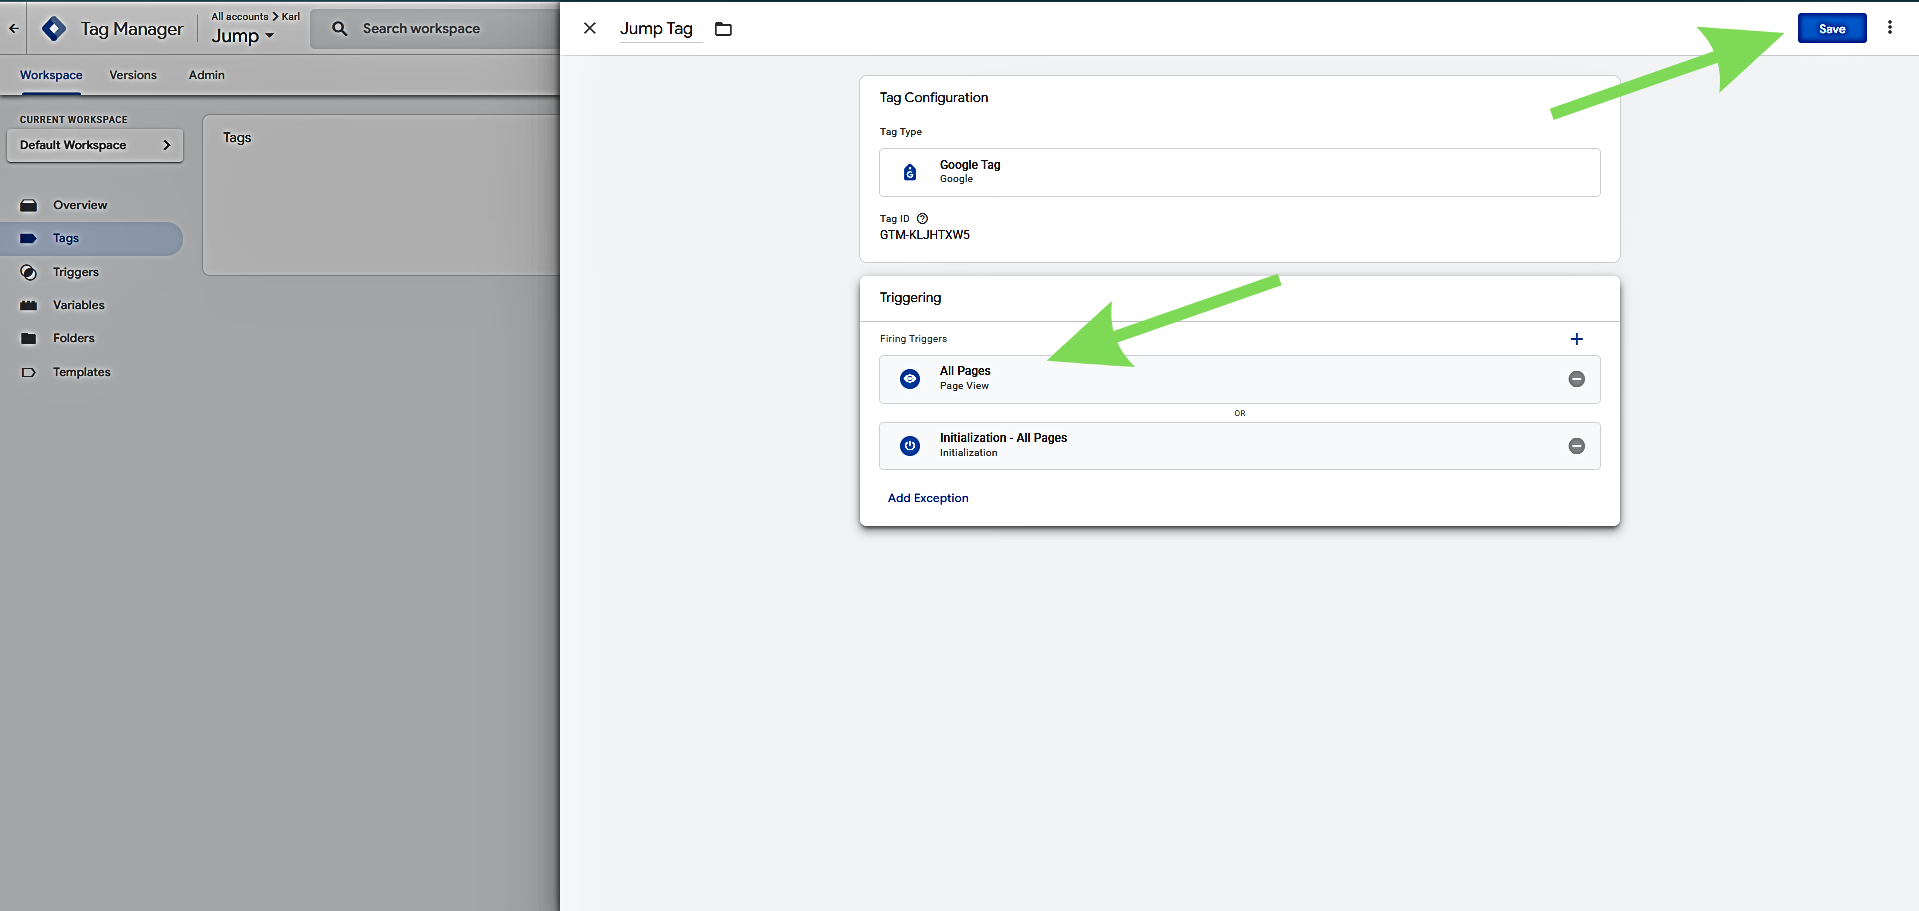
Step 6: Save and Publish
Click Save, then go to Submit, then Publish it to make the tag live. Without publishing, the tag will not fire on your site.
Common Mistakes to Avoid
- Not publishing your container: Changes in GTM remain drafts until you click Submit, then Publish. Skipping this step prevents any tags from going live.
- Installing GTM on a parent theme: Any code added directly to a parent theme will be lost during updates. Use a child theme or a plugin like GTM4WP or WPCode.
- Using GTM alongside direct tracking codes: Adding Google Analytics, Facebook Pixel, or other scripts outside of GTM can result in duplicate data. Manage all tracking exclusively through GTM.
- Placing snippets in the wrong location:
- Snippet 1 goes inside the <head> section.
- Snippet 2 goes immediately after the opening <body> tag. Incorrect placement can prevent tags from firing.
- Not testing tags before publishing: Always use GTM’s Preview mode to verify that tags are working before going live.
- Forgetting to clear WordPress cache: Caching plugins may serve pages without the GTM code. Clear your cache after installation or updates, then retest with Preview mode.
Conclusion
Installing Google Tag Manager on your WordPress site is a foundational step for effective website tracking and analytics management. Once GTM is set up, you no longer need to manually edit theme files or rely on multiple plugins for individual scripts. All tracking tools, including Google Analytics, Facebook Pixel, and conversion tags, are managed centrally in the GTM dashboard. This setup makes it easy to add, update, or remove tags quickly, reduces errors, and ensures consistent data collection across your site.