
Tracking your website data is essential if you want to understand how visitors interact with your content. Google Analytics 4 (GA4) is the current standard for tracking traffic, user behavior, and performance across your WordPress site.
In this article, we will show you how to install Google Analytics 4 in WordPress using the simplest and most reliable method. This includes creating your GA4 property, setting up a web data stream, connecting Site Kit by Google, and verifying that your tracking is working correctly.
Key Takeaway:
Installing Google Analytics 4 in WordPress involves creating a GA4 property, adding a web data stream, and connecting it through the Site Kit by Google plugin. Once connected, GA4 automatically tracks user activity on your site without requiring manual code installation. To ensure accurate data, verify your setup and allow 24 to 48 hours for analytics data to fully populate.
Step 1: Create Your Google Analytics 4 Property
Begin by going to Google Analytics. If you don’t have an account yet, create one using your Google account. If you already have access, simply log in.

After logging into your Google Analytics account, go to the Admin section. From there, click Property Details and review your website name, time zone, and currency to ensure everything is correct. Make sure you select Google Analytics 4, as it is the current version used for tracking.
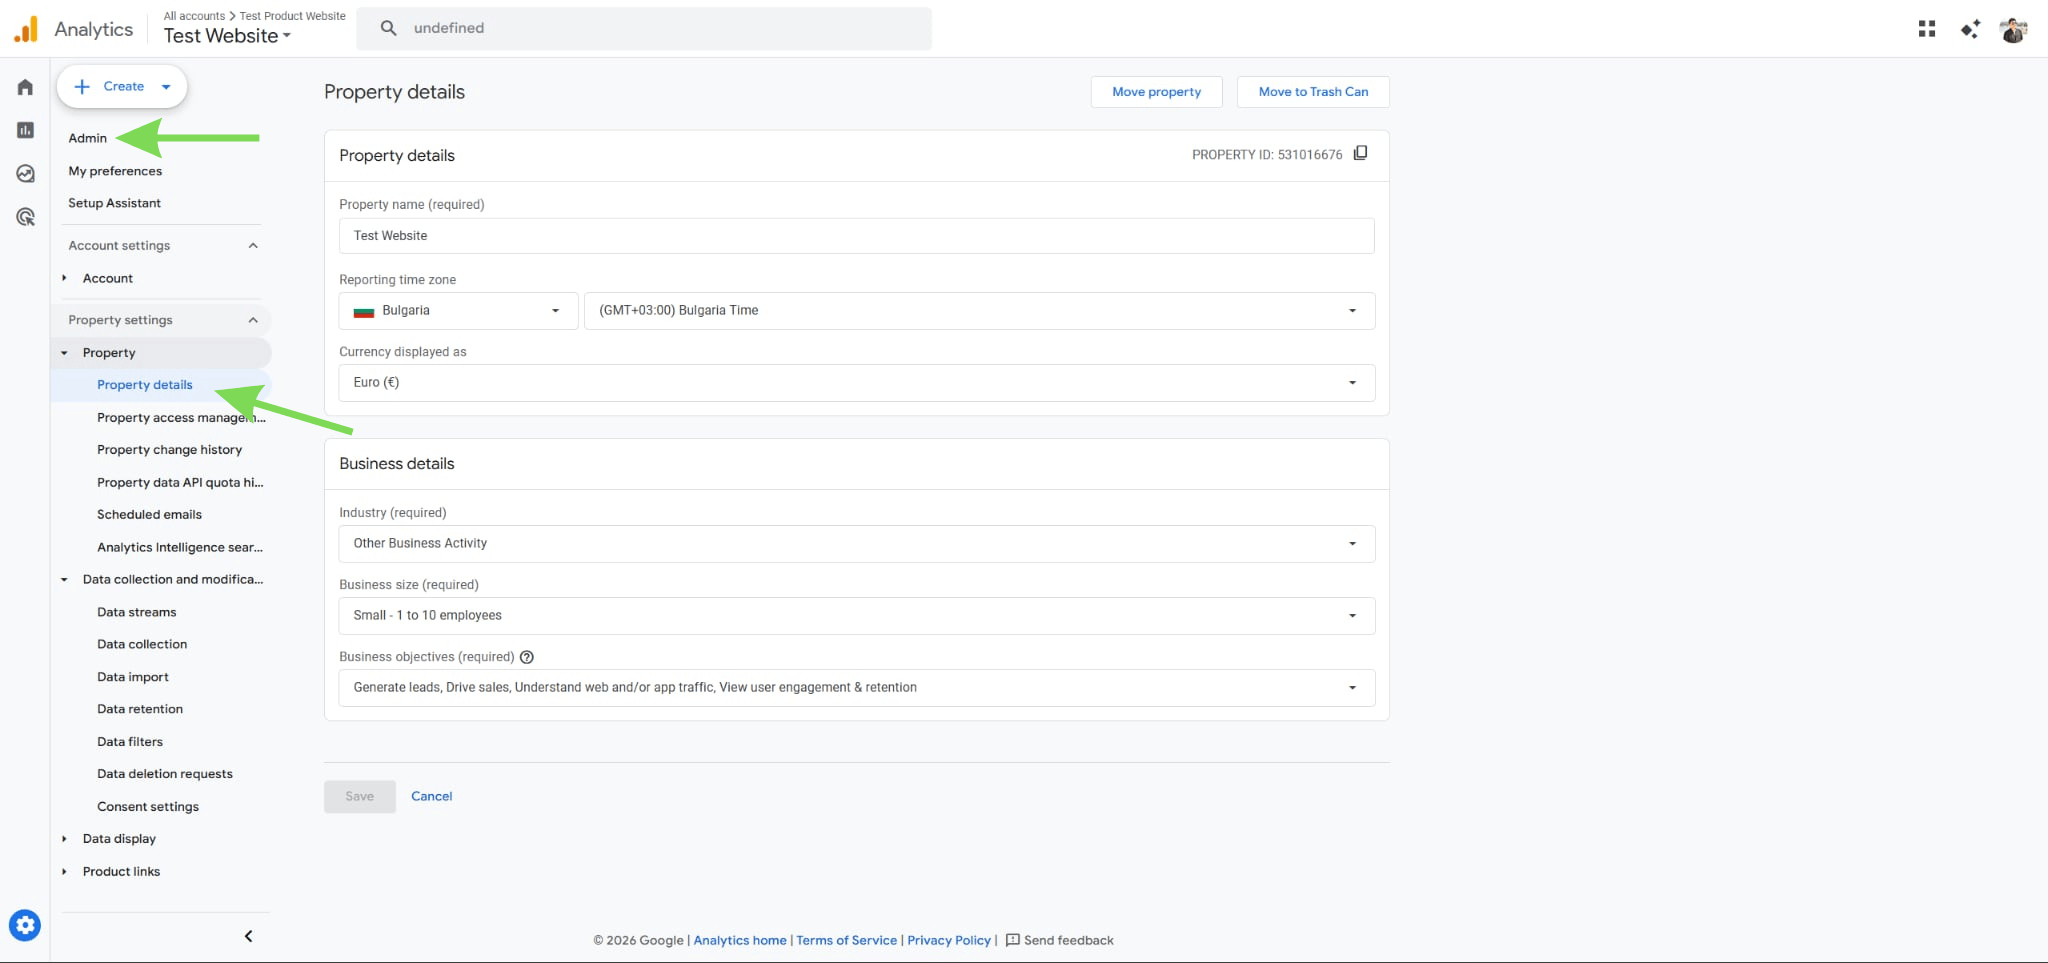
This property acts as the central place where all your website data will be collected and organized. Without it, your WordPress site cannot send any information to Google Analytics. Taking a moment to set this up correctly avoids issues later in the process.
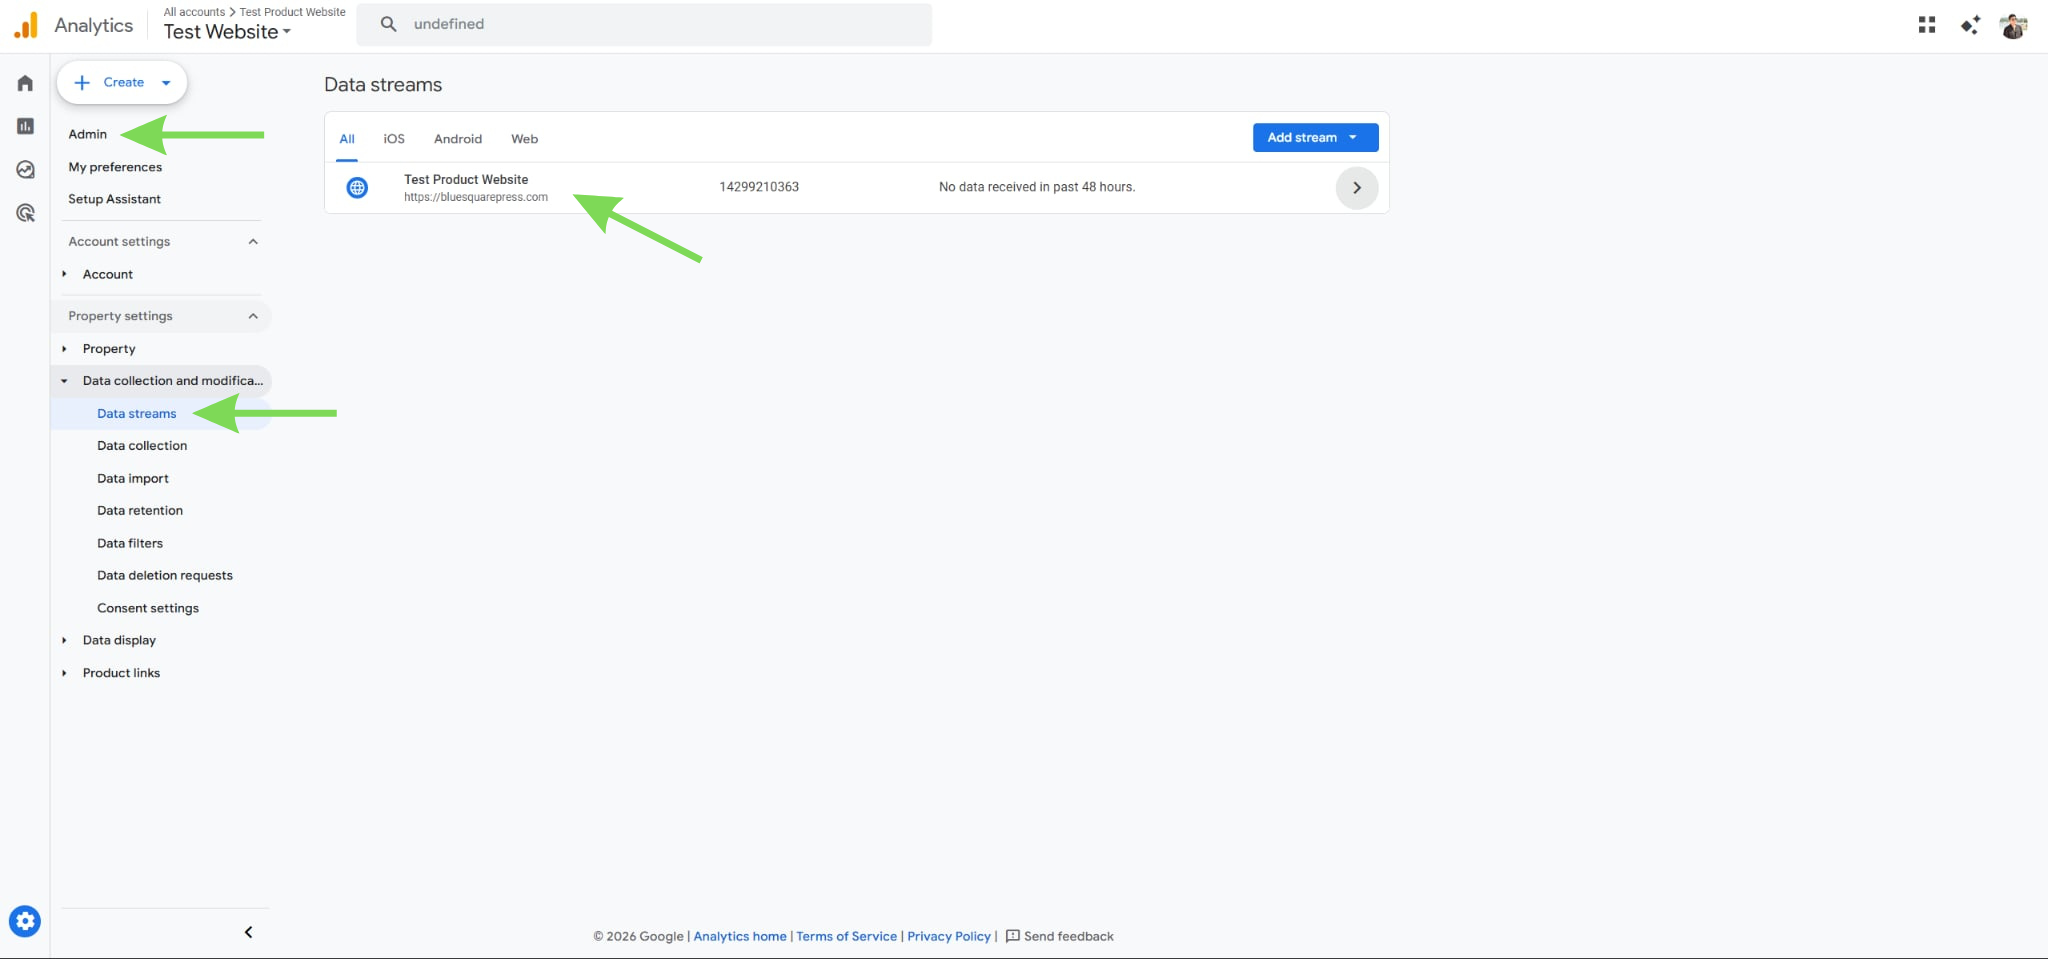
Step 2: Add a Web Data Stream for Your WordPress Site
After creating your property, choose Web to add a data stream and enter your website URL. Give your stream a clear name so it is easy to recognize later. This step connects your website to Google Analytics and defines where your data will come from.
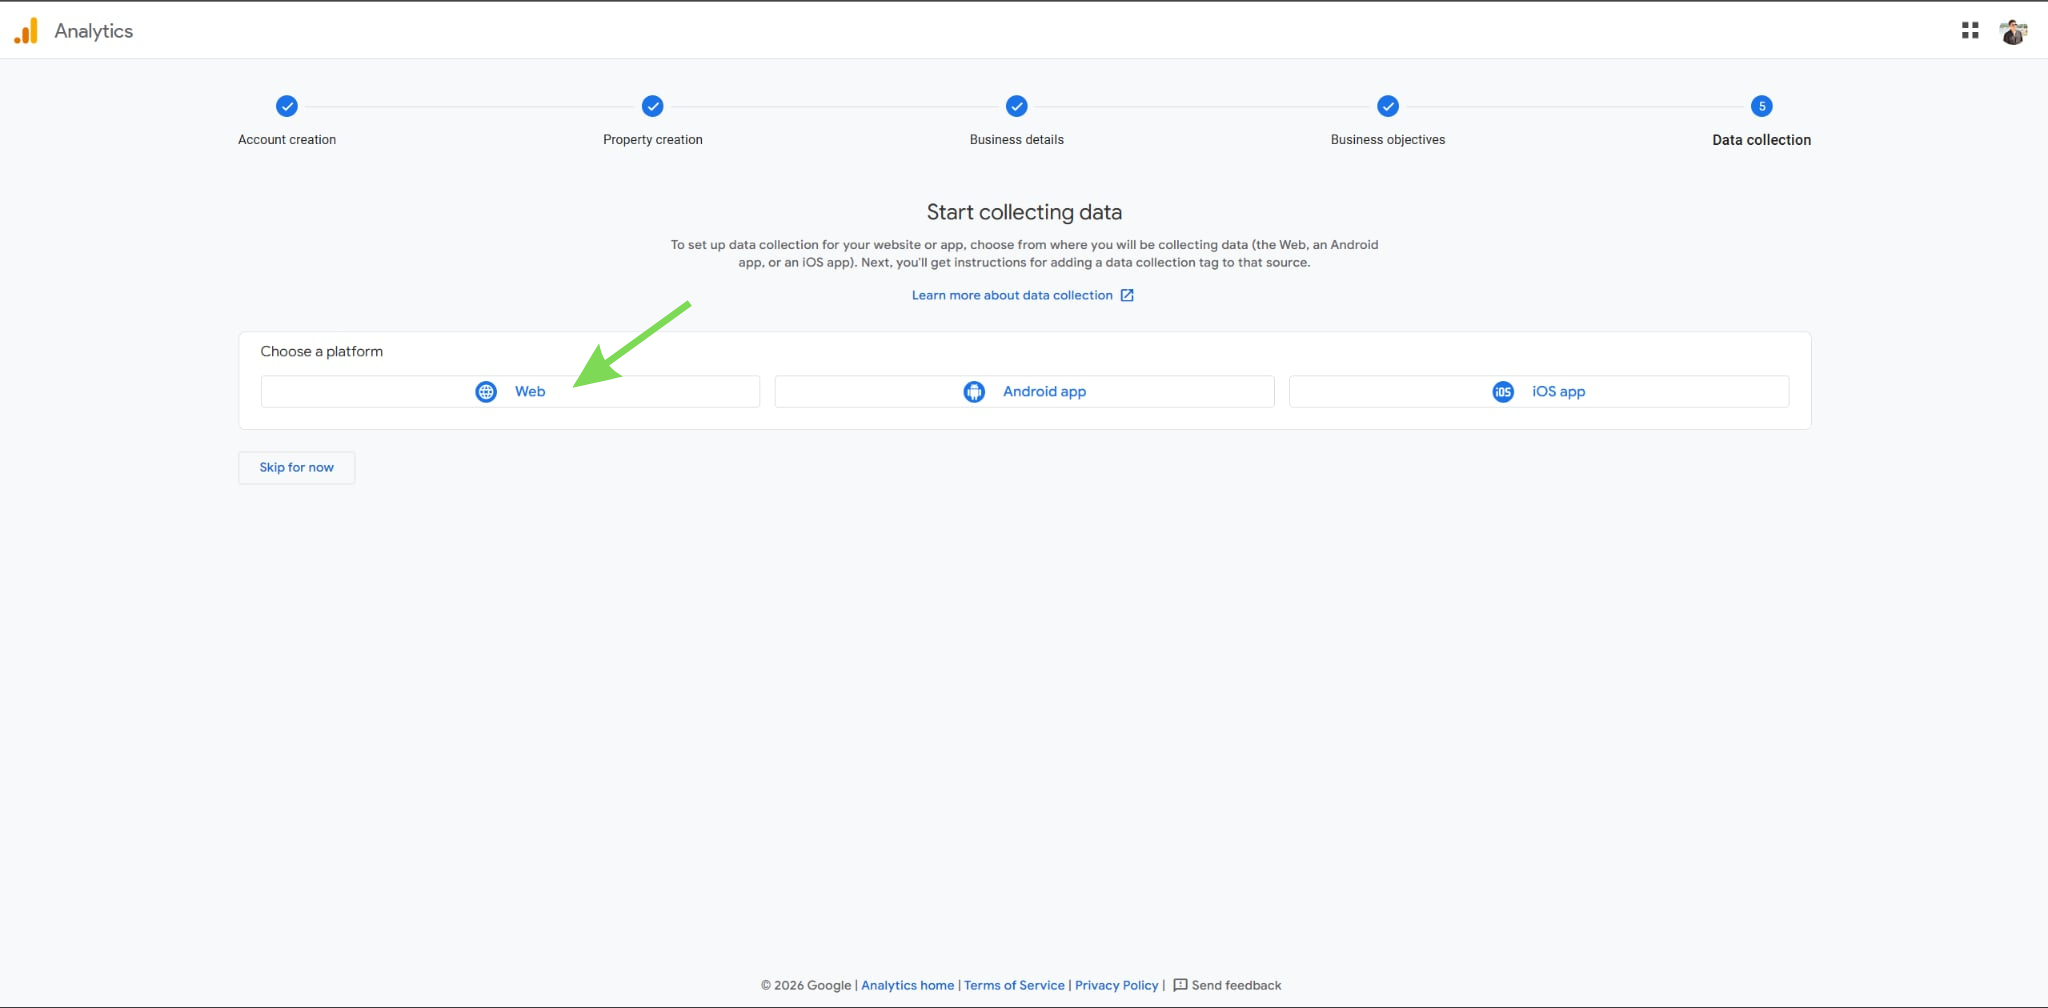
It ensures GA4 can begin tracking activity on your WordPress site. Keep enhanced measurement enabled so basic interactions like page views and scrolling are tracked automatically. This allows data collection to start immediately without additional configuration.
Step 3: Install Site Kit by Google in WordPress
Log in to your WordPress dashboard and go to Plugins > Add New. Search for Site Kit by Google, then install and activate it. This is the official Google Analytics WordPress plugin, which simplifies the entire setup process.
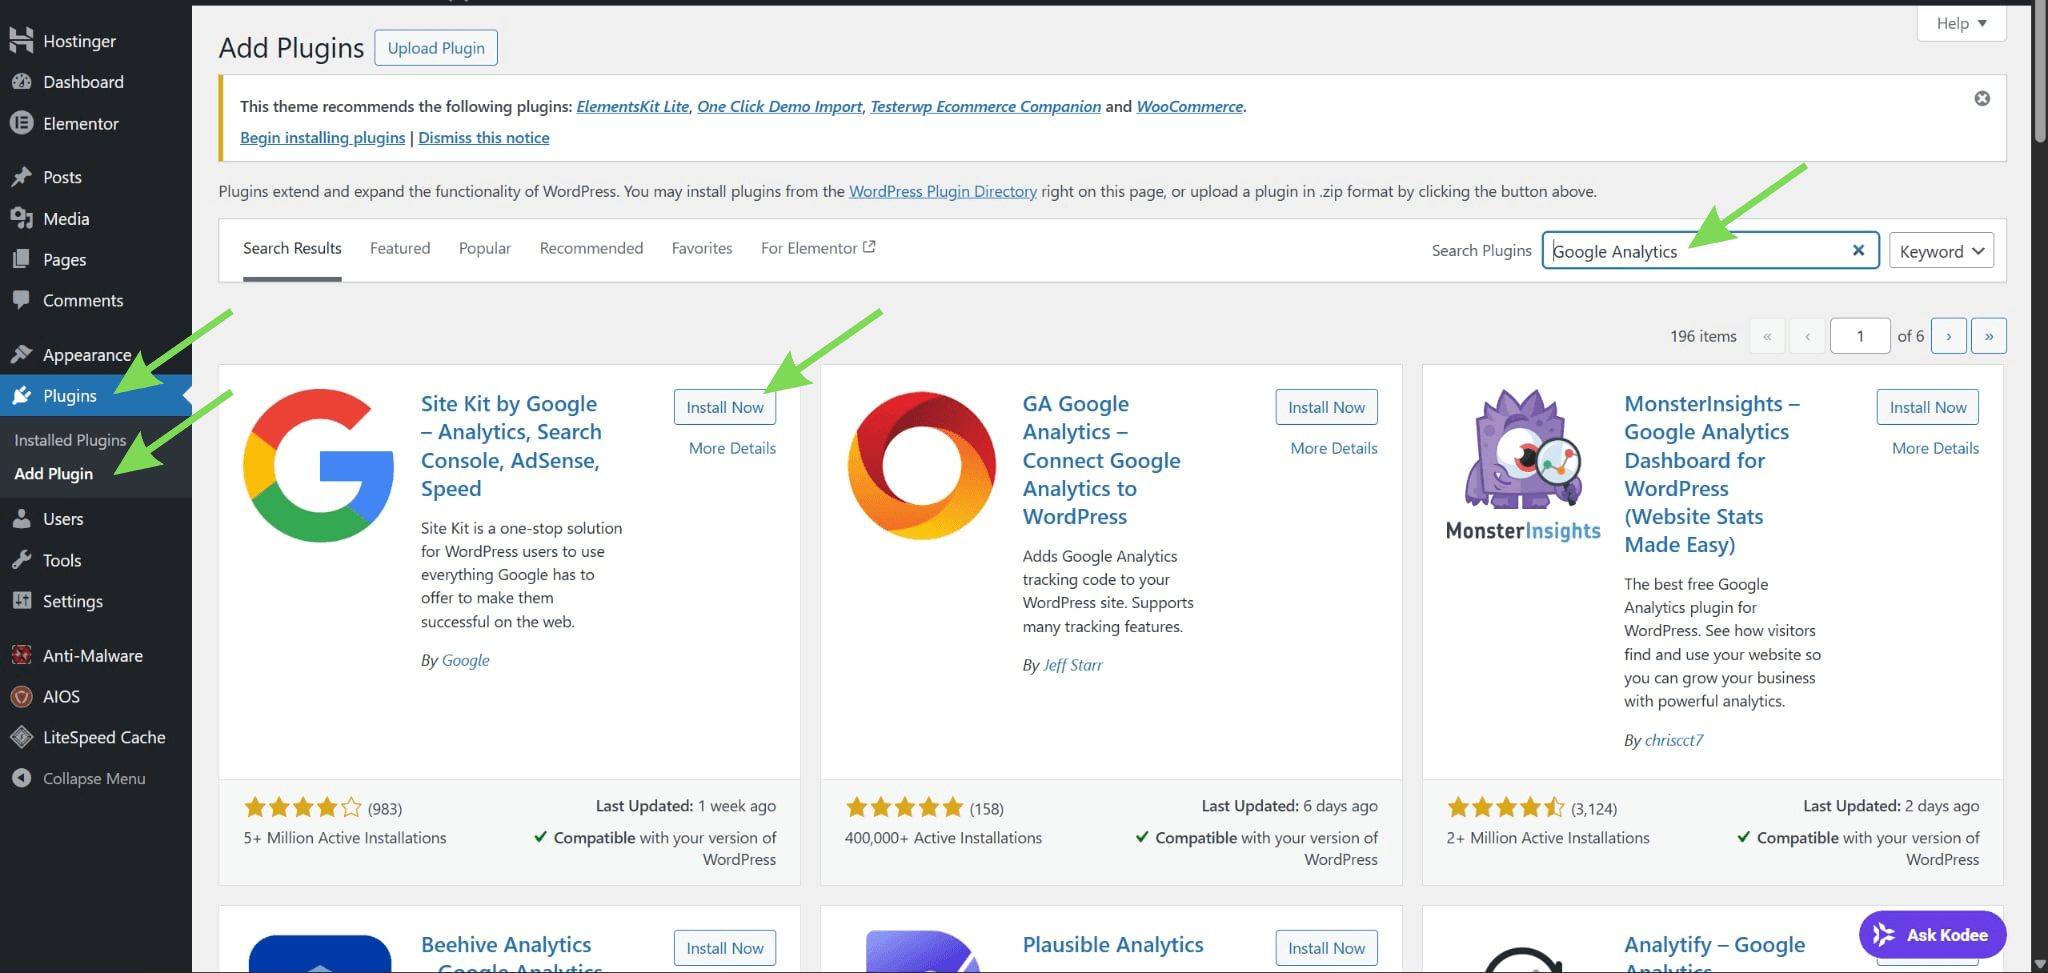
It removes the need to manually insert tracking code into your hosting setup. Everything is handled directly inside your dashboard. Using Site Kit also reduces the risk of errors compared to manual installation methods.
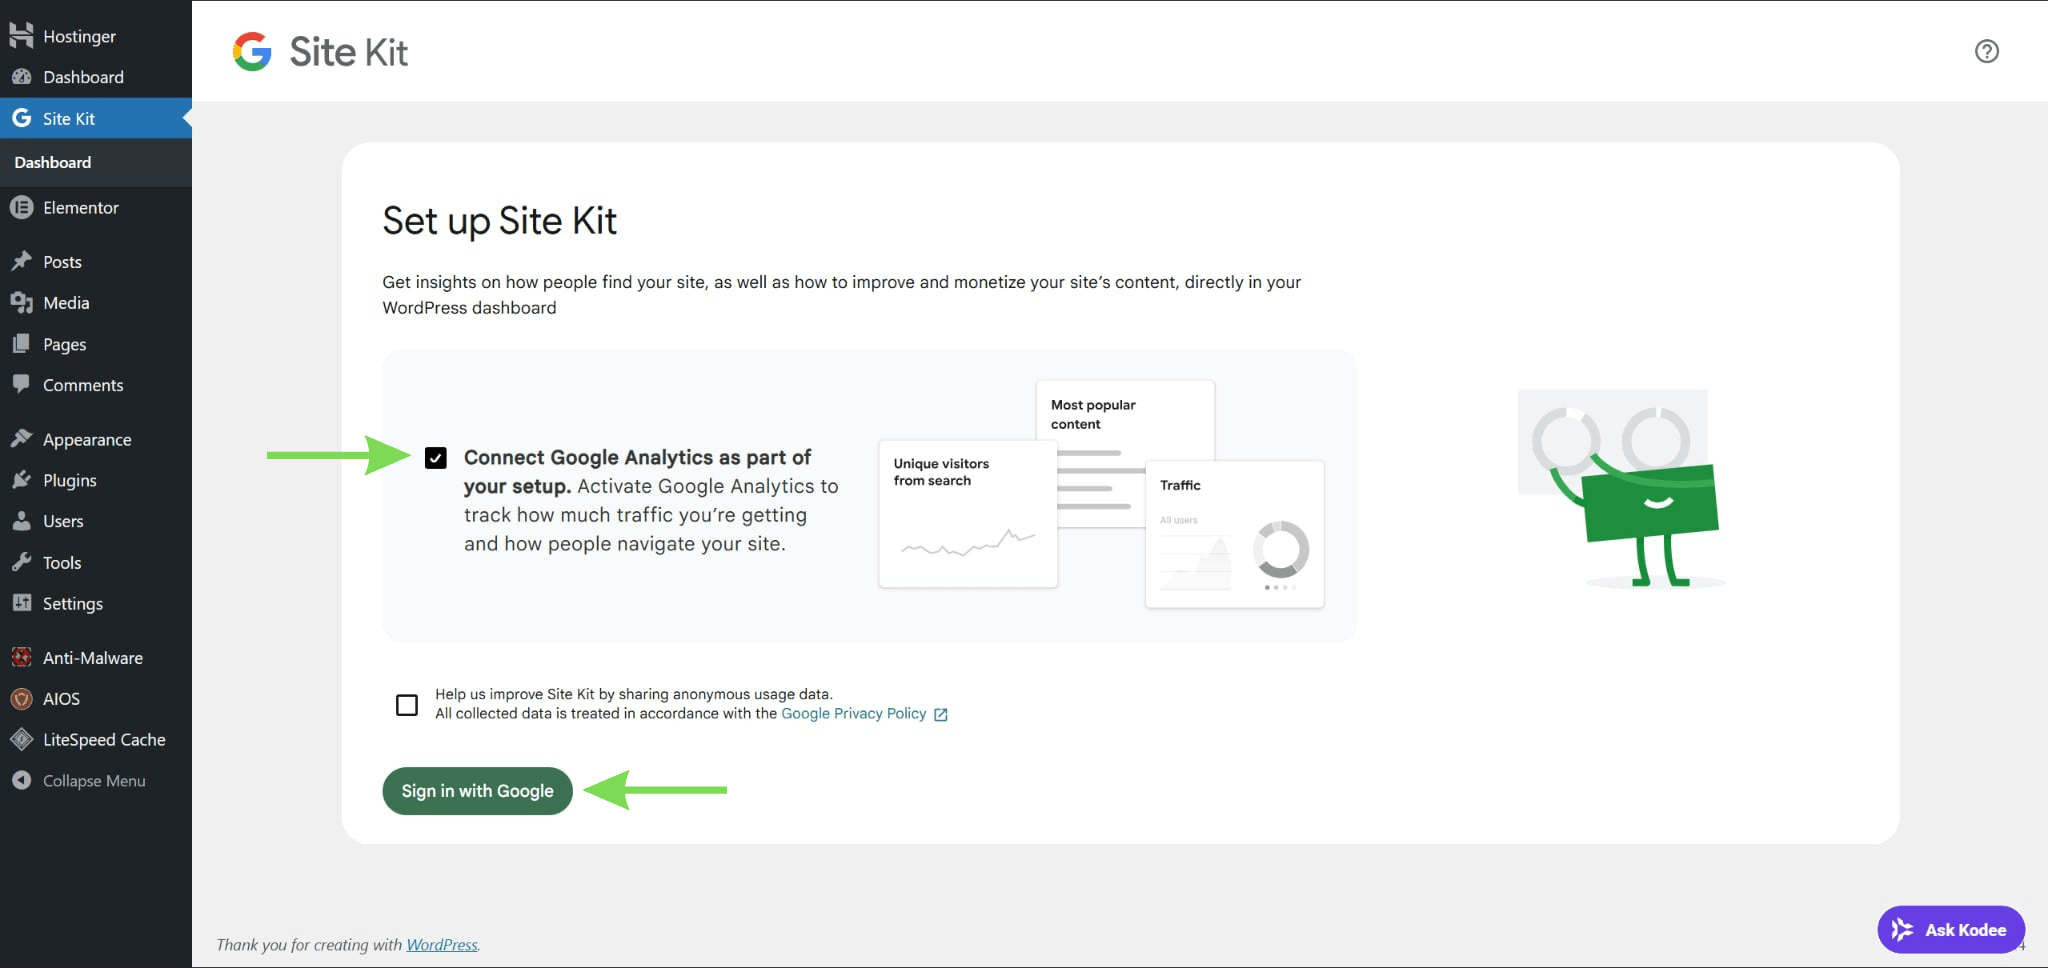
Step 4: Connect Site Kit to Your Google Account
Open Site Kit and click Start Setup to begin the connection process. Sign in using the same Google account that owns your GA4 property. Grant all required permissions so the plugin can access your data and complete the setup.
Using the correct account is important to ensure your site connects to the right analytics property. This step also allows Site Kit to manage your tracking automatically. Skipping or rushing this part can lead to connection issues later.

Step 5: Connect Google Analytics 4 to WordPress
During setup, Site Kit will ask you to connect to Google Analytics. Select Google Analytics, then choose your GA4 property and web data stream. This is the step where your website becomes fully linked to GA4.
Once completed, Site Kit automatically installs the Google tag on your site. This enables tracking without needing to edit any code. A correct connection here ensures your data starts flowing properly into your analytics reports.
Step 6: Find and Confirm Your GA4 Measurement ID
Go to Admin > Data Streams in Google Analytics and open your web stream.
Locate your Measurement ID, which usually starts with G-. This ID confirms that your website is connected to the correct GA4 property.
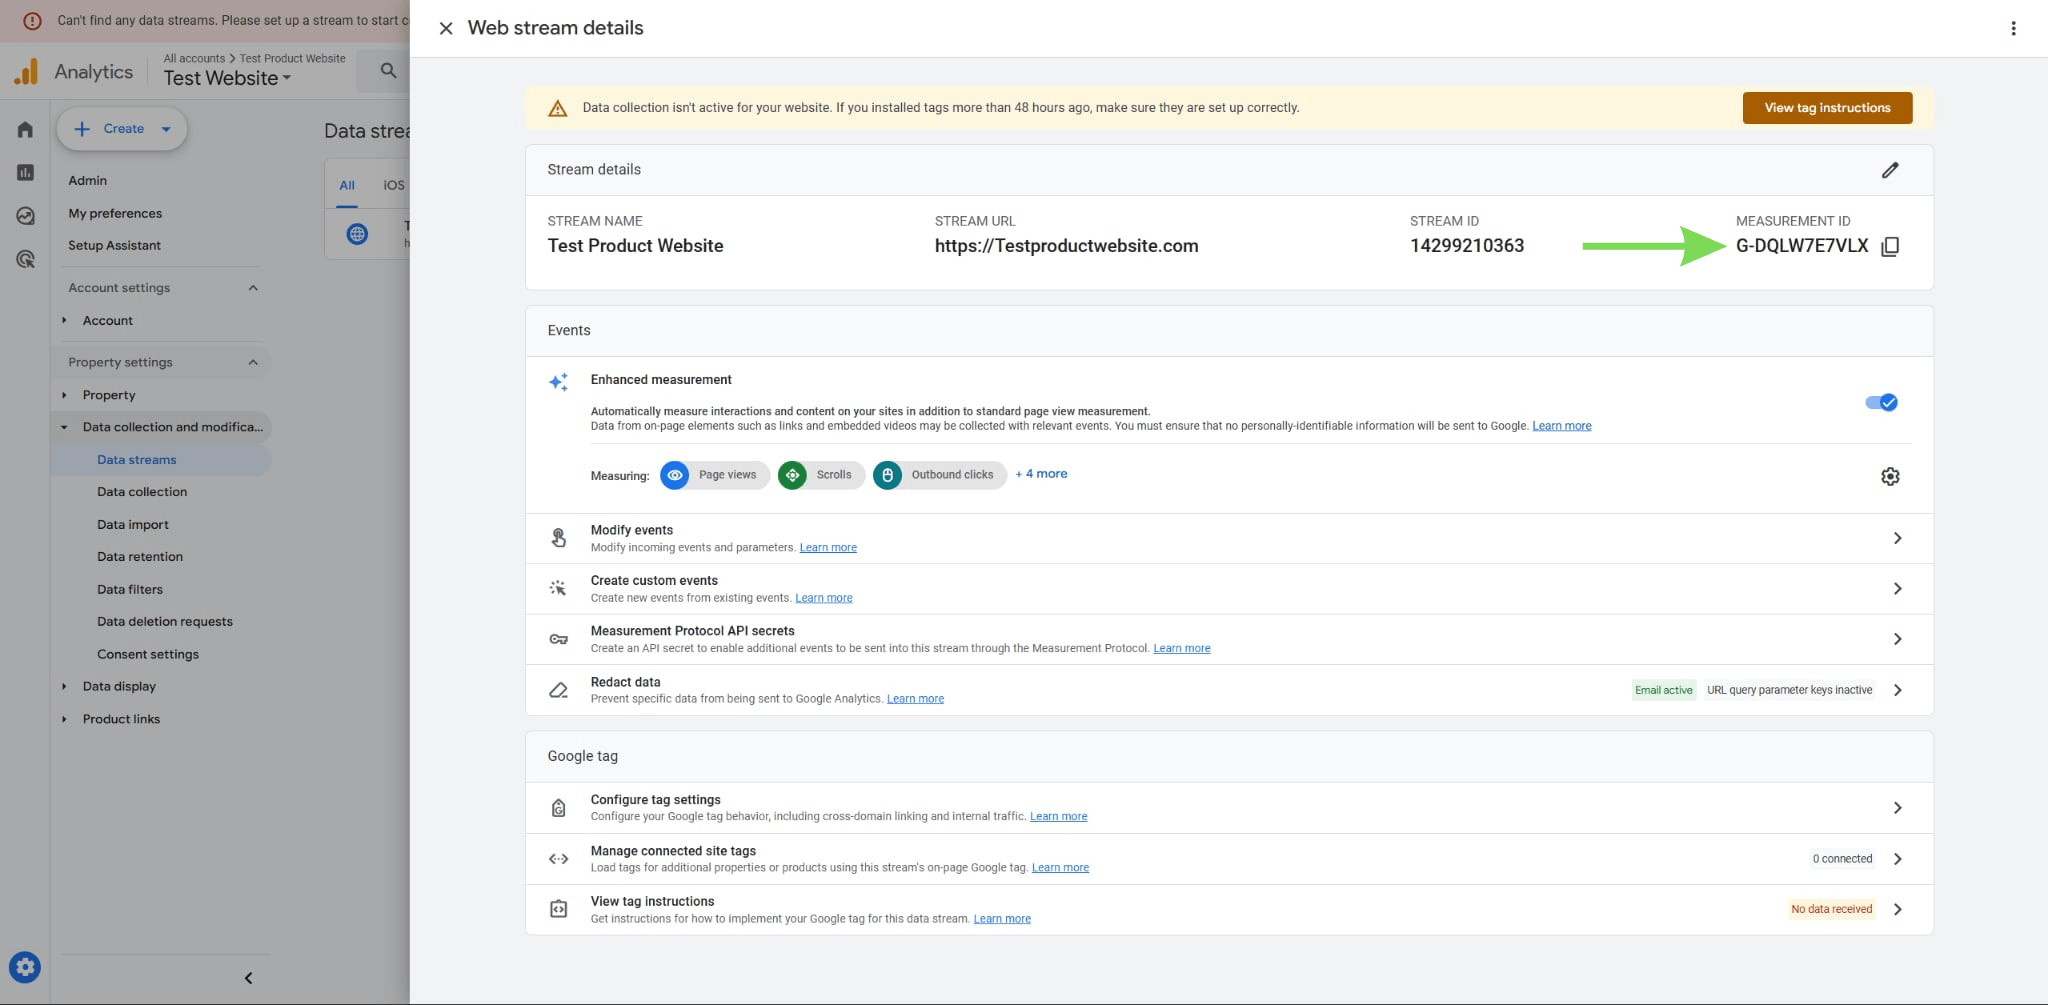
It also helps you verify that the right data stream is being used. Checking this detail ensures your setup is accurate before moving forward. Taking this step helps prevent tracking errors or mismatched data later on.
Step 7: Allow Data to Populate and Confirm Tracking
After completing the setup, give Google Analytics 4 time to process and display your data. Instead of relying solely on immediate results, wait 24 to 48 hours to monitor your website visitors more accurately.
During this period, GA4 collects and organizes data from your WordPress site. You can still check the Realtime report for quick confirmation, but it may not reflect full activity right away. A short delay is normal, especially for new installations. Waiting ensures your data is more consistent and reliable. This step helps confirm that your GA4 setup is working as expected over time.
Alternative Method: Add GA4 Tracking Code via functions.php
For users who prefer more control over their setup, you can install Google Analytics 4 manually by adding the tracking code directly to your theme’s functions.php file. This method avoids using plugins and is typically used by developers or users comfortable editing WordPress theme files.
To do this, go to your WordPress dashboard and navigate to Appearance > Theme File Editor, then open the functions.php file of your active theme. You will add a function that inserts the GA4 tracking code into your site’s <head> section.
Here is an example snippet you can use:
function add_ga4_tracking_code() {
?>
<!-- Google tag (gtag.js) -->
<script async src="https://www.googletagmanager.com/gtag/js?id=G-XXXXXXXXXX"></script>
<script>
window.dataLayer = window.dataLayer || [];
function gtag(){dataLayer.push(arguments);}
gtag(„js“, new Date());
gtag(„config“, „G-XXXXXXXXXX“);
</script>
<?php
}
add_action(„wp_head“, „add_ga4_tracking_code“);
Replace G-XXXXXXXXXX with your actual GA4 Measurement ID. After saving your changes, you can verify the installation using the Realtime report in Google Analytics 4.
As a best practice, consider using a child theme to prevent your changes from being overwritten during theme updates.
Fix Common GA4 Installation Issues in WordPress
If your data is not showing, review each step carefully to find the issue. Most problems occur when the wrong Google account is used or the wrong GA4 property is selected. An incomplete Site Kit setup can also prevent tracking from working properly.
Caching plugins or server delays may also slow data collection. Make sure your website is publicly accessible during setup. These simple checks usually resolve most installation problems quickly.
Maintain Accurate Tracking and Monitor Performance
Regularly review your analytics setup to ensure data is being collected correctly and consistently. Periodic checks help catch issues like disconnected properties, plugin conflicts, or tracking gaps early, keeping your data reliable. Use the Realtime and standard reports in Google Analytics 4 to confirm that user activity is being recorded as expected. Monitoring key metrics such as page views, engagement, and traffic sources helps you spot unusual changes and identify potential problems.
If you make updates to your website, such as changing themes or installing new plugins, revisit your analytics setup to make sure tracking is still working properly. Small changes can sometimes affect how data is collected.
Conclusion
Setting up Google Analytics 4 in WordPress is essential for understanding your site's traffic, user behavior, and overall performance. By following the correct setup process, from creating your GA4 property to connecting it through Site Kit, you ensure your website collects accurate and reliable data. Allowing time for data to populate and verifying your setup helps prevent tracking issues and gives you a solid foundation for making informed decisions.
At Jump.bg, we know that reliable analytics also depend on a stable and optimized hosting environment. Our WordPress hosting is built to deliver consistent performance, helping ensure your tracking works smoothly without interruptions or data gaps. If you need help getting started or want a hosting setup that supports accurate data collection, you can reach out to us anytime at support@jump.bg.